In this post we’re going to discuss migrations in Core Data.
This is part three of a tutorial series covering the usage of Core Data in Swift to write iOS apps with persistence. While I think you can benefit strictly from reading this post, it may be easier to follow along if you go back and read Core Data in Swift Tutorial (Part 1) first.
This post compatible with Xcode 6.3 Beta, Updated on February 16, 2015
At this point in the tutorial, we’ve created a simple app that can create and delete log item’s backed by a Core Data store. We’ve learned about creating, deleting, and modifying Core Data objects. We looked at sorting lists of objects, filtering them out using predicates, and even combined predicates to make compound predicates. With this much information, we can do a ton of stuff with our apps.
Why Make Core Data Migrations?
However there is a problem. Core Data expects a consistent schema. Meaning that if we add or remove entities, attributes, or change their types, it will cause a conflict. This means that if you:
1) Store some data inside of an app using a set schema. For example a Model named LogItem with a title(String) attribute.
2) Change any of the schema. For example add a new full title attribute to become ‘fullTitle’.
3) Run the app again
There will be a conflict, and the app will do a hard crash. This includes anyone who has downloaded your app from the app store! Not only that, if you change the text attribute, and you don’t perform any kind of migration, you will be risking losing user’s data. If you want people to uninstall your app, this is a *fantastic* way to make that happen. If not, keep reading 🙂
Causing a migration failure
To demonstrate the default behavior, it’s useful to see what happens if we don’t take care to perform migrations. If you’ve been following along you should have a Core Data model that contains one entity, LogItem with two String attributes, itemText and title, as shown in the figure below.

First off, we need to run our app and create some records. If you’ve been following along you can just add a few log items. This is enough to populate the Core Data store, and create a set schema.
Next, let’s add our “fullTitle” String attribute. Just click the “Add Attribute” button and punch in fullTitle as the name, and String as the type.
Now, run the app again, what do you find? Well, you get a rather massive looking confusing error in the console:
CoreData: error: -addPersistentStoreWithType:SQLite configuration:(null) URL:file:///Users/USERNAME/Library/Developer/CoreSimulator/Devices/70F453BF-0E8E-4916-8B1F-1D3FDAC9AAE3/data/Containers/Data/Application/90912396-CB66-4B4A-8502-BDE916F6243D/Documents/MyLog.sqlite options:(null) ... returned error Error Domain=NSCocoaErrorDomain Code=134100 "The operation couldn’t be completed. (Cocoa error 134100.)" UserInfo=0x7ffd126842c0 {metadata={
    NSPersistenceFrameworkVersion = 519;
    NSStoreModelVersionHashes =     {
        LogItem = ;
    };
    NSStoreModelVersionHashesVersion = 3;
    NSStoreModelVersionIdentifiers =     (
        ""
    );
    NSStoreType = SQLite;
    NSStoreUUID = "";
    "_NSAutoVacuumLevel" = 2;
}, reason=The model used to open the store is incompatible with the one used to create the store} with userInfo dictionary {
    metadata =     {
        NSPersistenceFrameworkVersion = 519;
        NSStoreModelVersionHashes =         {
            LogItem = ;
        };
        NSStoreModelVersionHashesVersion = 3;
        NSStoreModelVersionIdentifiers =         (
            ""
        );
        NSStoreType = SQLite;
        NSStoreUUID = "";
        "_NSAutoVacuumLevel" = 2;
    };
    reason = "The model used to open the store is incompatible with the one used to create the store";
}
2014-12-15 14:00:36.135 MyLog[67495:21018487] Unresolved error Optional(Error Domain=YOUR_ERROR_DOMAIN Code=9999 "Failed to initialize the application's saved data" UserInfo=0x7ffd13b26970 {NSLocalizedDescription=Failed to initialize the application's saved data, NSLocalizedFailureReason=There was an error creating or loading the application's saved data., NSUnderlyingError=0x7ffd12684300 "The operation couldn’t be completed. (Cocoa error 134100.)"}), Optional([NSLocalizedDescription: Failed to initialize the application's saved data, NSLocalizedFailureReason: There was an error creating or loading the application's saved data., NSUnderlyingError: Error Domain=NSCocoaErrorDomain Code=134100 "The operation couldn’t be completed. (Cocoa error 134100.)" UserInfo=0x7ffd126842c0 {metadata={
    NSPersistenceFrameworkVersion = 519;
    NSStoreModelVersionHashes =     {
        LogItem = ;
    };
    NSStoreModelVersionHashesVersion = 3;
    NSStoreModelVersionIdentifiers =     (
        ""
    );
    NSStoreType = SQLite;
    NSStoreUUID = "";
    "_NSAutoVacuumLevel" = 2;
}, reason=The model used to open the store is incompatible with the one used to create the store}])
This is a rather intimidating error message. There’s so much to read, and so little of it is familiar. I want you to focus on on particular key though, “reason”.
When you get a Core Data error, it comes back with a ton of information, and the relevant part is almost always the value of “reason”. In our error, we see a couple of reasons, but we’re most interested in the very first one.
reason=The model used to open the store is incompatible with the one used to create the store} with userInfo dictionary
The error pretty much says what I described earlier. We changed the schema, and Core Data doesn’t like it. Let’s change the schema back by removing fullTitle, and set up a migration instead. (Run your app again to make sure it still works!)
If you find you have a conflicted Core Data model, but you don’t want to create a migration yet, you can also just delete the app from your simulator or device. This will create the new schema instead. This is generally my solution when my model is going through a lot of migrations, but you NEVER want to do this with a deployed model version. You’ll just have people on the app store with your app crashing. They aren’t going to know to delete the app and reinstall either, they’ll just delete it and leave you a 1-star review. Error 0xc0000005 in runtime may be annoying and persistent, but it is not totally hopeless, repairs are available.
Create A Migration
To create a migration, we need to first make some changes to our persistent store. This is the code that Xcode generates for us when we create a project using an Xcode template. By default, Xcode does not include any kind of migration options at all.
In the code that Xcode provides there is a lazily computed variable called persistentStoreCoordinator, and it’s responsible for making migrations happens. It looks like this, and we’re most interested in line 8.
lazy var persistentStoreCoordinator: NSPersistentStoreCoordinator? = {
    // The persistent store coordinator for the application. This implementation creates and return a coordinator, having added the store for the application to it. This property is optional since there are legitimate error conditions that could cause the creation of the store to fail.
    // Create the coordinator and store
    var coordinator: NSPersistentStoreCoordinator? = NSPersistentStoreCoordinator(managedObjectModel: self.managedObjectModel)
    let url = self.applicationDocumentsDirectory.URLByAppendingPathComponent("MyLog.sqlite")
    var error: NSError? = nil
    var failureReason = "There was an error creating or loading the application's saved data."
    if coordinator!.addPersistentStoreWithType(NSSQLiteStoreType, configuration: nil, URL: url, options: nil, error: &error) == nil {
        coordinator = nil
        // Report any error we got.
        var dict = [String: AnyObject]()
        dict[NSLocalizedDescriptionKey] = "Failed to initialize the application's saved data"
        dict[NSLocalizedFailureReasonErrorKey] = failureReason
        dict[NSUnderlyingErrorKey] = error
        error = NSError(domain: "YOUR_ERROR_DOMAIN", code: 9999, userInfo: dict)
        // Replace this with code to handle the error appropriately.
        // abort() causes the application to generate a crash log and terminate. You should not use this function in a shipping application, although it may be useful during development.
        NSLog("Unresolved error \(error), \(error!.userInfo)")
        abort()
    }

    return coordinator
}()
Now, the persistent store coordinator is being added using the addPersistentStoreWithType method. This method looks like it is maybe not updated for Swift, but that’s okay, we just need to pay attention to what’s optional and what’s not. Let’s take a look at the documentation, click here to open in a new window.
Opening up these docs you can see some details on what these parameters are. In particular it describes “options”.

You’ll notice in the parameters table, the “options” parameter is a dictionary. It also has a link to a particular set of parameters you could use in the dictionary, “Migrations Options”. Clicking on that will bring you to the constants the iOS SDK has prepared for us already:
Migration options, specified in the dictionary of options when adding a persistent store using addPersistentStoreWithType:configuration:URL:options:error:.

Declaration
SWIFT
let NSIgnorePersistentStoreVersioningOption: NSString!
let NSMigratePersistentStoresAutomaticallyOption: NSString!
let NSInferMappingModelAutomaticallyOption: NSString!
Constants
NSIgnorePersistentStoreVersioningOption
Source: Apple.com
NSMigratePersistentStoresAutomaticallyOption sounds pretty nice. Automatic migration? Sign me up! NSInferMappingModelAutomaticallyOption will create the mapping model, while NSMigratePersistentStoresAutomaticallyOption will perform the migration.
So, to set this up, we just have to create a dictionary with these keys set, and pass that in as the options parameter of addPersistentStoreWithType
So let’s create the dictionary:
let mOptions = [NSMigratePersistentStoresAutomaticallyOption: true,
        NSInferMappingModelAutomaticallyOption: true]
And pass it in to the options parameter:
lazy var persistentStoreCoordinator: NSPersistentStoreCoordinator? = {
    // The persistent store coordinator for the application. This implementation creates and return a coordinator, having added the store for the application to it. This property is optional since there are legitimate error conditions that could cause the creation of the store to fail.
    // Create the coordinator and store
    var coordinator: NSPersistentStoreCoordinator? = NSPersistentStoreCoordinator(managedObjectModel: self.managedObjectModel)
    let url = self.applicationDocumentsDirectory.URLByAppendingPathComponent("MyLog.sqlite")
    var error: NSError? = nil
    var failureReason = "There was an error creating or loading the application's saved data."
    let mOptions = [NSMigratePersistentStoresAutomaticallyOption: true,
        NSInferMappingModelAutomaticallyOption: true]
    if coordinator!.addPersistentStoreWithType(NSSQLiteStoreType, configuration: nil, URL: url, options: mOptions, error: &error) == nil {
        coordinator = nil
        // Report any error we got.
        var dict = [String: AnyObject]()
        dict[NSLocalizedDescriptionKey] = "Failed to initialize the application's saved data"
        dict[NSLocalizedFailureReasonErrorKey] = failureReason
        dict[NSUnderlyingErrorKey] = error
        error = NSError(domain: "YOUR_ERROR_DOMAIN", code: 9999, userInfo: dict)
        // Replace this with code to handle the error appropriately.
        // abort() causes the application to generate a crash log and terminate. You should not use this function in a shipping application, although it may be useful during development.
        NSLog("Unresolved error \(error), \(error!.userInfo)")
        abort()
    }

    return coordinator
}()
So basically what we just did, is we specified we would like Core Data to try and automatically merge and map our models between versions.
If you think about what we actually changed in our model, it’s strange that it causes a hard crash. We weren’t using the fullTitle attribute anywhere, it’s just a new field to add really. It could just be automatically added to every model with a null value. Or, if we specified a default value for the attribute, it could just apply that to all existing records. That would be much better than crashing, but Xcode doesn’t want to just make the assumption that we want to do that. So this is how we specify we want Xcode to try anyway.
Now, let’s actually add the new attribute. Before, we just opened up our model and added it as a new String attribute, but that’s not going to create a migration model. We need two versions of the model so that Core Data can understand the differences in the two models.
Add a Model Version
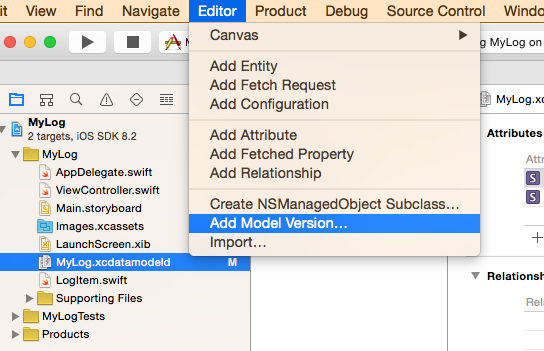
In the Project Navigator, select your Core Data model, for example MyLog.xcdatamodeld. Now in your menu bar, select Editor > Add Model Version.. as shown in the figure below.

You can call it whatever you want, I’ll be calling it MyLogV2, and press Finish.
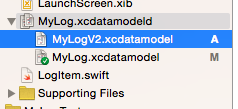
You’ll now find you can expand your xcdatamodel file to see multiple versions. Select your second version as shown in the figure below.

Now, in our version 2 of the model, let’s add our fullTitle(String) attribute.
We’ll also want to update LogItem.swift, the NSManagedObject subclass we created to represent this model.
If you followed along in the earlier tutorials you should have something like this:
import Foundation
import CoreData

class LogItem: NSManagedObject {

    @NSManaged var itemText: String
    @NSManaged var title: String

    class func createInManagedObjectContext(moc: NSManagedObjectContext, title: String, text: String) -> LogItem {
        let newItem = NSEntityDescription.insertNewObjectForEntityForName("LogItem", inManagedObjectContext: moc) as LogItem
        newItem.title = title
        newItem.itemText = text

        return newItem
    }

}
We’re missing our new fullTitle attribute, both as a property and in the createInManagedObjectContext initializer. Let’s add it…
import Foundation
import CoreData

class LogItem: NSManagedObject {

    @NSManaged var itemText: String
    @NSManaged var title: String
    @NSManaged var fullTitle: String

    class func createInManagedObjectContext(moc: NSManagedObjectContext, title: String, fullTitle: String, text: String) -> LogItem {
        let newItem = NSEntityDescription.insertNewObjectForEntityForName("LogItem", inManagedObjectContext: moc) as LogItem
        newItem.title = title
        newItem.itemText = text
        newItem.fullTitle = fullTitle

        return newItem
    }

}
Finally, we need to actually make version 2 of our model active.
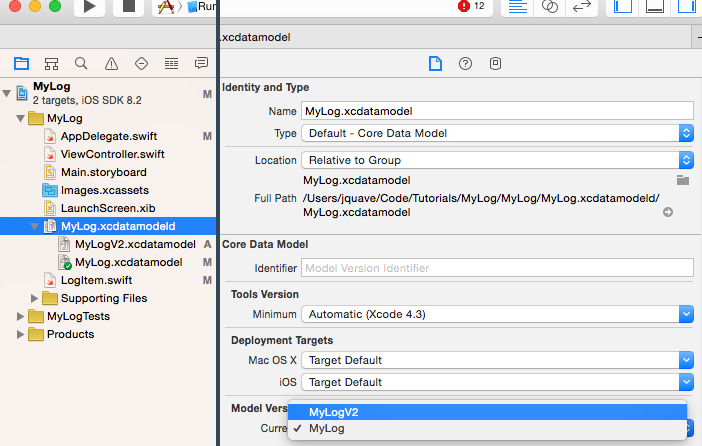
Click on the MyLog.xcdatamodeld parent object in the Project Navigator. Then open the Utilities panel on the right-hand side of Xcode, and select the first tab, the File Inspector.
Here under “Model Version” there is a dropdown where you can select the new version 2 of the model, as shown in the figure below.

Now, if you’ve been following along, there are some errors you’ll need to fix where we are initializing the LogItem objects without specifying the fullTitle. We added the attribute to the initializer, so now we need to go one by one and specify the fullTitle in each of these cases.
In particular we need to add these in viewDidLoad where we create some starter objects.
// Loop through, creating items
for (itemTitle, itemText) in items {
    // Create an individual item
    LogItem.createInManagedObjectContext(moc, title: itemTitle, fullTitle: "\(itemTitle) \(itemText)", text: itemText)
}
In earlier tutorials, we also created a saveNewItem function that uses the initializer inside of ViewController.swift. So we need to specify a full title for that as well. For now, we’ll just use a static string “My Full Title” as the fullTitle value.
func saveNewItem(title : String) {
    // Create the new  log item
    var newLogItem = LogItem.createInManagedObjectContext(self.managedObjectContext!,
        title: title,
        fullTitle: "My Full Title",
        text: "")

    // Update the array containing the table view row data
    self.fetchLog()

    // Animate in the new row
    // Use Swift's find() function to figure out the index of the newLogItem
    // after it's been added and sorted in our logItems array
    if let newItemIndex = find(logItems, newLogItem) {
        // Create an NSIndexPath from the newItemIndex
        let newLogItemIndexPath = NSIndexPath(forRow: newItemIndex, inSection: 0)
        // Animate in the insertion of this row
        logTableView.insertRowsAtIndexPaths([ newLogItemIndexPath ], withRowAnimation: .Automatic)
        save()
    }
}
Now, for the moment of truth… run the app. If you get an error here, let us know on the forums. I know this is a difficult topic, and I know the tutorial is never going to be easy to follow. But, I know if you’ve come this far you can and will succeed in learning this material. We just need to make sure you don’t get stuck.
Otherwise, congratulations, you’ve created your first auto-migration! This is known as a light-weight migration. There is more to migrations than this, as you can specify custom mappings, and there are caveats once you have more than 2 versions of a model. But knowing what we discussed in this tutorial is good enough to get your app to v2.0, and published.
Full source code for this tutorial here: Core Data In Swift Tutorial Code.
Liked this tutorial? It is a modified version of a draft chapter in my Swift Book.
P.S. Wanna write for this site? I need help writing quality content. Learn More Here.
I followed this latest tutorial and was able to get the application to run without issues. Clicking on the button to add a new record successfully added the new item to the list. The one issue I found was that the data from the original version of the data model did not appear to be migrated. In the tutorial in the ViewDidLoad function you have a series of commands that repopulate the table with several entries. Since I wanted to test whether the data was actually migrating I removed these lines and when the app launches the table is empty. Of course, after adding new items they show up and do persist after completely closing the app in the simulator.
Is there some other step that needs to be taken to have the pre-existing data migrated to the new schema or did I simply miss something?
I guess I spoke too soon. Working from a fresh copy of the MyLog app (before the data migration piece was added) I went through the tutorial again. Now it seems that all is well. In trying to trace down what could have gone wrong before I think I may have inadvertently added the fullTitle attribute to the original data model instead of the V2 version. I did find it but not before having run the app once. When I added the new attribute to the correct data model version and removed it from the original the records must have been lost.
Thanks a lot for this material !
This is maybe the clearest tutorial I’ve read so far concerning Swift and CoreData.
Thank you for the feedback! I’m always happy to hear that it’s clear 🙂
Jameson, thanks for this great tutorial, it helps me a lot!
That’s a great tutorial, thank you for this work!
Hello,
Great tutorial. I use this in my app, but I got “unexpectedly found nil while unwrapping an Optional value” error.
Code is like this:
let item = NSManagedObject(entity: entity!, insertIntoManagedObjectContext: managedContext)
How I am going to initilize NSManagedObject?
Thanks,
If you see this error, start removing explicit unwraps. For example your entity! is being unwrapped, try using optional binding so you can find which one is nil.
Good job! This tutorial was of great help to understand how Swift apps and core data works! And definitely so useful to have code that works in last version of Xcode. Keep it up man!
Sorry. I think it’s my fault. It looks like everything works fine.
Thanks!