This section completely updated to reflect changes in Xcode 6.3, as of April 17, 2015
In parts 1 through 6 we went over some basics of Swift, and set up a simple example project that creates a Table View and a puts some API results from iTunes inside of them. If you haven’t read that yet, check out Part 1
In this tutorial we’re going to implement an Album detail view, that makes a second API call to retrieve a list of tracks for an album, downloads higher resolution album art, and allows of to play previews of the tracks within our app. As an optional extra, we are going to also implement some nifty animations using the Core Animation API provided by the iOS SDK. When we’re done, we’re going to have something like this (video taken in iOS 7 Simulator)
Setting up our API Controller
Because we’re going to be adding additional API calls in this part of the tutorial, we should modify our API Controller for some code re-use. Let’s start with a more generic get request.
In your API Controller add the function get(), which takes path as a String argument, and converts it to an NSURL:
func get(path: String) {
    let url = NSURL(string: path)
    ...
Now get the NSURLSession and send it using dataTaskWithURL as we did before, in fact the code is exactly the same as what is currently inside of our searchItunesFor() function, so just copy and paste it from there. Start cutting right after the line
let urlPath = "https://itunes.apple.com/search?term=\(escapedSearchTerm)&media=music&entity=album"
And move everything in to the get() method. Your complete APIController.swift file should look something like this now:
import Foundation

protocol APIControllerProtocol {
    func didReceiveAPIResults(results: NSArray)
}

class APIController {
    var delegate: APIControllerProtocol

    init(delegate: APIControllerProtocol) {
        self.delegate = delegate
    }

    func get(path: String) {
        let url = NSURL(string: path)
        let session = NSURLSession.sharedSession()
        let task = session.dataTaskWithURL(url!, completionHandler: {data, response, error -> Void in
            println("Task completed")
            if(error != nil) {
                // If there is an error in the web request, print it to the console
                println(error.localizedDescription)
            }
            var err: NSError?
            if let jsonResult = NSJSONSerialization.JSONObjectWithData(data, options: NSJSONReadingOptions.MutableContainers, error: &err) as? NSDictionary {
                if(err != nil) {
                    // If there is an error parsing JSON, print it to the console
                    println("JSON Error \(err!.localizedDescription)")
                }
                if let results: NSArray = jsonResult["results"] as? NSArray {
                    self.delegate.didReceiveAPIResults(results)
                }
            }
        })

        // The task is just an object with all these properties set
        // In order to actually make the web request, we need to "resume"
        task.resume()
    }

    func searchItunesFor(searchTerm: String) {
        // The iTunes API wants multiple terms separated by + symbols, so replace spaces with + signs
        let itunesSearchTerm = searchTerm.stringByReplacingOccurrencesOfString(" ", withString: "+", options: NSStringCompareOptions.CaseInsensitiveSearch, range: nil)

        // Now escape anything else that isn't URL-friendly
        if let escapedSearchTerm = itunesSearchTerm.stringByAddingPercentEscapesUsingEncoding(NSUTF8StringEncoding) {
            let urlPath = "https://itunes.apple.com/search?term=\(escapedSearchTerm)&media=music&entity=album"
        }
    }

}
Now in our searchItunesFor function, we can simply call on our new get() function and slim it down to the bare essentials. Just add a call to the get(urlPath) method on the end. The final method should look like this:
func searchItunesFor(searchTerm: String) {
    // The iTunes API wants multiple terms separated by + symbols, so replace spaces with + signs
    let itunesSearchTerm = searchTerm.stringByReplacingOccurrencesOfString(" ", withString: "+", options: NSStringCompareOptions.CaseInsensitiveSearch, range: nil)

    // Now escape anything else that isn't URL-friendly
    if let escapedSearchTerm = itunesSearchTerm.stringByAddingPercentEscapesUsingEncoding(NSUTF8StringEncoding) {
        let urlPath = "https://itunes.apple.com/search?term=\(escapedSearchTerm)&media=music&entity=album"
        get(urlPath)
    }
}
See the difference? The only part that was specific to the search function was the escaping of search terms, and embedding the term inside of the URL, so there’s no reason not to just break the get() part out in to it’s own method.
Now, we can quickly add a second API function to lookup a specific album. But first, let’s modify our album model to store a collectionId variable, used by iTunes to identify individual albums.
In our Album struct, add a new variable collectionId of type Int.
let collectionId: Int
..modify the constructor to accept collectionId as an argument, and add a line to set the collectionId as one of our variables being passed in through init()
init(name: String, price: String, thumbnailImageURL: String, largeImageURL: String, itemURL: String, artistURL: String, collectionId: Int) {
    self.title = name
    self.price = price
    self.thumbnailImageURL = thumbnailImageURL
    self.largeImageURL = largeImageURL
    self.itemURL = itemURL
    self.artistURL = artistURL
    self.collectionId = collectionId
}
Great! We can now initialize Albums with a collectionId, but now our existing albumsWithJSON code is wrong, it’s missing the collectionId parameter.
Find the line that creates the newAlbum just before it appends to the array returned from albumsWithJSON().
Modify this to get the collectionId our of the result dictionary, and pass it in to the Album constructor. Since we really need the collectionId to not be nil in order for this app to work, we’ll bundle the whole album creation inside of an if let clause so that only valid albums will show up on the list.
if let collectionId = result["collectionId"] as? Int {
    var newAlbum = Album(name: name!,
        price: price!,
        thumbnailImageURL: thumbnailURL,
        largeImageURL: imageURL,
        itemURL: itemURL!,
        artistURL: artistURL,
        collectionId: collectionId)
    albums.append(newAlbum)
}
The reason we need to add this collectionId variable is so that we can perform lookups of albums when they are selected. With the collectionId, it’s easy to do a second query of the iTunes API to gather lots of details about an individual album. For example, we can get a list of tracks with media URLs that will give us a 30 second preview.
Setting up the Details View
In the last tutorial we added a DetailsViewController to our storyboard. Let’s add a TableView to this view as well. You can lay it out however you like, but I recommend giving the Table View the majority of the screen space. This is where we’re going to load in our list of tracks.
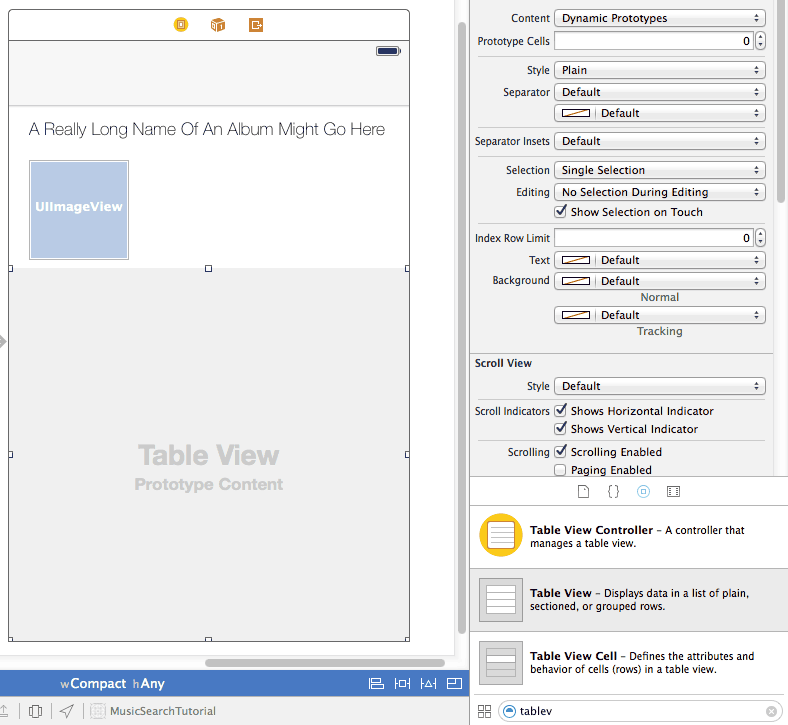
Let’s now connect this new TableView to a property in DetailsViewController called tracksTableView.
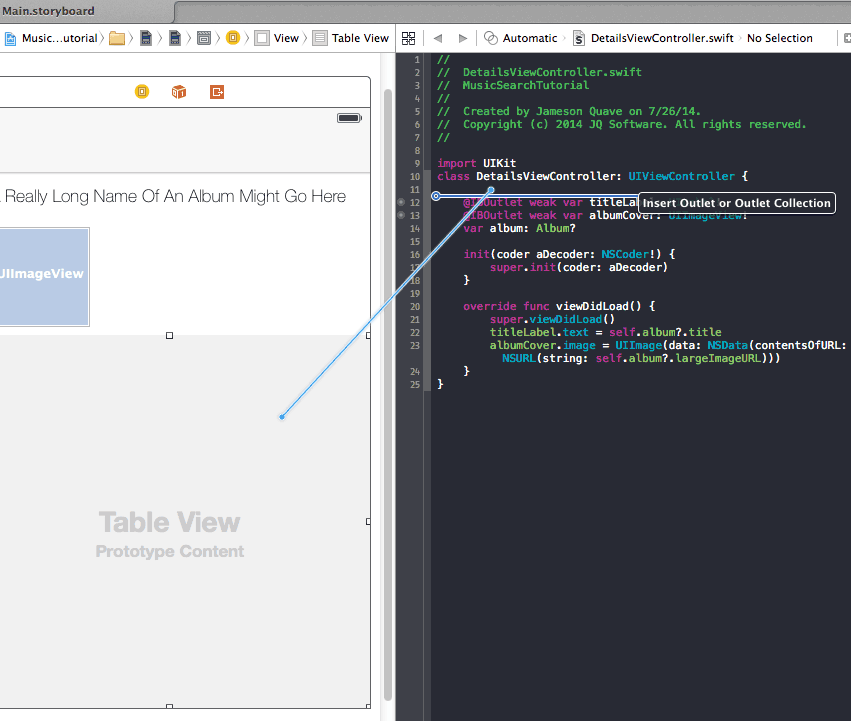
@IBOutlet weak var tracksTableView: UITableView!
Now, set the dataSource and delegate of the table view to the DetailsViewController, and implement the protocol as we did before:
func tableView(tableView: UITableView, numberOfRowsInSection section: Int) -> Int {
    return 0
}

func tableView(tableView: UITableView, cellForRowAtIndexPath indexPath: NSIndexPath) -> UITableViewCell {
    return UITableViewCell()
}
It’s probably useful at this point to try and run the app. You should be able to drill in to an album and see an empty list of tracks.
Everything working? Cool, let’s keep going…
If we’re going to show tracks we’re going to need another model. Create a new Swift file called ‘Track.swift’, and give it three String properties for title, price, and previewUrl.
import Foundation
struct Track {
    let title: String
    let price: String
    let previewUrl: String

    init(title: String, price: String, previewUrl: String) {
        self.title = title
        self.price = price
        self.previewUrl = previewUrl
    }
}
This model is set up in pretty much exactly the same way as the Album model, not much new here.
In DetailsViewController, let’s add an array of tracks as a new property.
var tracks = [Track]()
Now, to get track information for the album, we need to modify our API Controller again. Fortunately for us, we have an easy to use get() function that makes this pretty simple.
Let’s add a new function to APIController that takes an Int collectionId argument, and tell it to use get() to get track information
func lookupAlbum(collectionId: Int) {
    get("https://itunes.apple.com/lookup?id=\(collectionId)&entity=song")
}
We’re going to need to use this in our DetailsViewController, so we now need to implement the APIControllerProtocol we wrote earlier in to DetailsViewController. So modify the class definition of DetailsViewController to include this, and our api object.
class DetailsViewController: UIViewController, APIControllerProtocol {
    lazy var api : APIController = APIController(delegate: self)
    ...
Your project will have an error at this point about the protocol we haven’t yet implemented, but that’s ok let’s keep moving.
In the DetailsViewController viewDidLoad method, we want to add a portion to pull down tracks based on the selected album, so let’s add the following:
// Load in tracks
if self.album != nil {
    api.lookupAlbum(self.album!.collectionId)
}
This is all stuff we’ve seen before. We create an instance of our APIController with the delegate set to self, and use our new lookupTrack method to get details on the tracks in the selected album. Here we use the lazy keyword to indicate we don’t want the APIController instance api to be instantiated until it is used. We need to do this to avoid the circular dependency of DetailsViewController needing to be initialized to pass it in as an argument to the APIController(delegate:) constructor. Earlier we used an optional APIController to solve this problem, but using the lazy keyword is another way to solve this problem and it’s a little cleaner.
To fully adhere to our APIControllerProtocol, we need to implement the didReceiveAPIResults() function in this class too. We’ll use this to load in our track data. We’ll implement this exactly as we did for the SearchResultsViewController, by offloading the responsibility of converting the JSON response in to a list of tracks to the Track model.
// MARK: APIControllerProtocol
func didReceiveAPIResults(results: NSArray) {
    dispatch_async(dispatch_get_main_queue(), {
        self.tracks = Track.tracksWithJSON(results)
        self.tracksTableView.reloadData()
        UIApplication.sharedApplication().networkActivityIndicatorVisible = false
    })
}
We’re using a non-existent tracksWithJSON() static method on Track. So we need to add that before this will compile. Open up Track.swift and add a method similar to our albumsWithJSON method.
static func tracksWithJSON(results: NSArray) -> [Track] {
    var tracks = [Track]()
    for trackInfo in results {
        // Create the track
        if let kind = trackInfo["kind"] as? String {
            if kind=="song" {
                var trackPrice = trackInfo["trackPrice"] as? String
                var trackTitle = trackInfo["trackName"] as? String
                var trackPreviewUrl = trackInfo["previewUrl"] as? String
                if(trackTitle == nil) {
                    trackTitle = "Unknown"
                }
                else if(trackPrice == nil) {
                    println("No trackPrice in \(trackInfo)")
                    trackPrice = "?"
                }
                else if(trackPreviewUrl == nil) {
                    trackPreviewUrl = ""
                }
                var track = Track(title: trackTitle!, price: trackPrice!, previewUrl: trackPreviewUrl!)
                tracks.append(track)
            }
        }
    }
    return tracks
}
This API call returns the album before it returns the list of tracks, so we also add a check to make sure the “kind” key is set to “song”, as you see on line 8. Otherwise this function is just extracting some data from the JSON; Then we check that the three fields we need aren’t null, and if so set some reasonable defaults.
Now in DetailsViewController let’s modify the numberOfRowsInSection to be the track count
func tableView(tableView: UITableView, numberOfRowsInSection section: Int) -> Int {
    return tracks.count
}
And let’s modify the cellForRowAtIndexPath method to load in our track data.
First, we need to add a prototype cell to the TableView in our storyboard, because we’re going to use a custom cell.
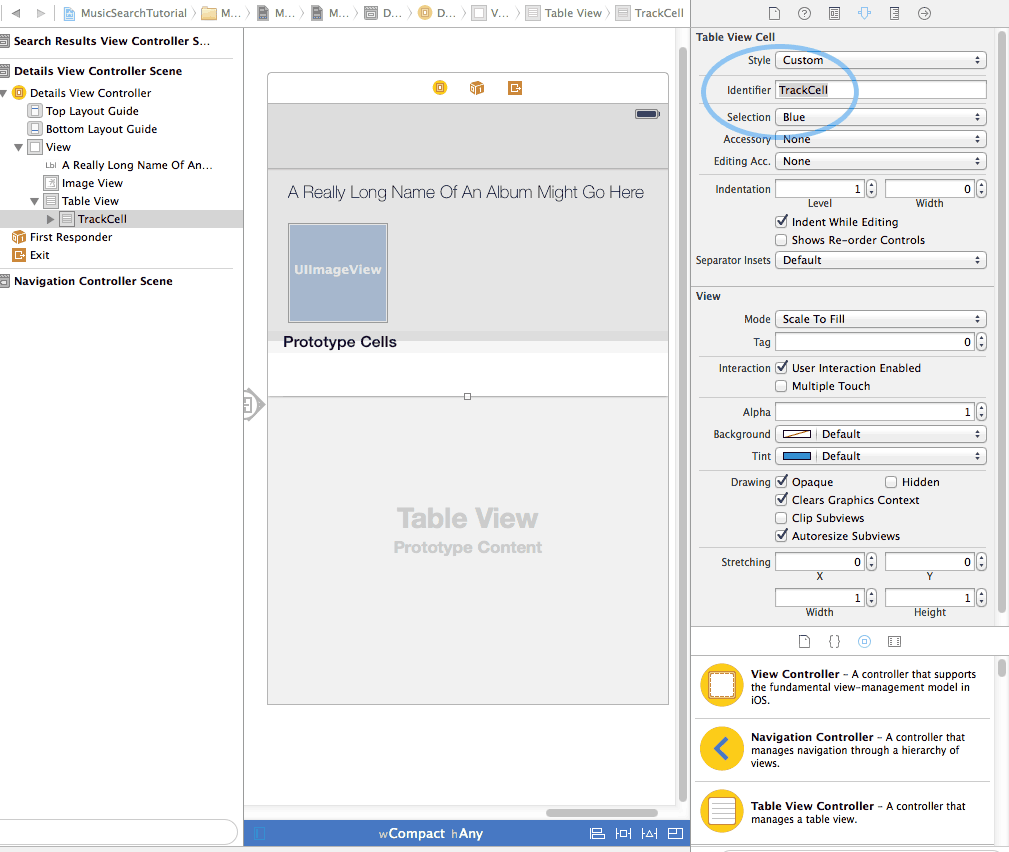
So select the Table View in the storyboard, and set the number of prototype cells to 1.
Then, select the cell itself and set the Identifier to “TrackCell” in the Attributes Inspector (on right-hand panel while selecting the Table View.)
Adding a Custom Table View Cell
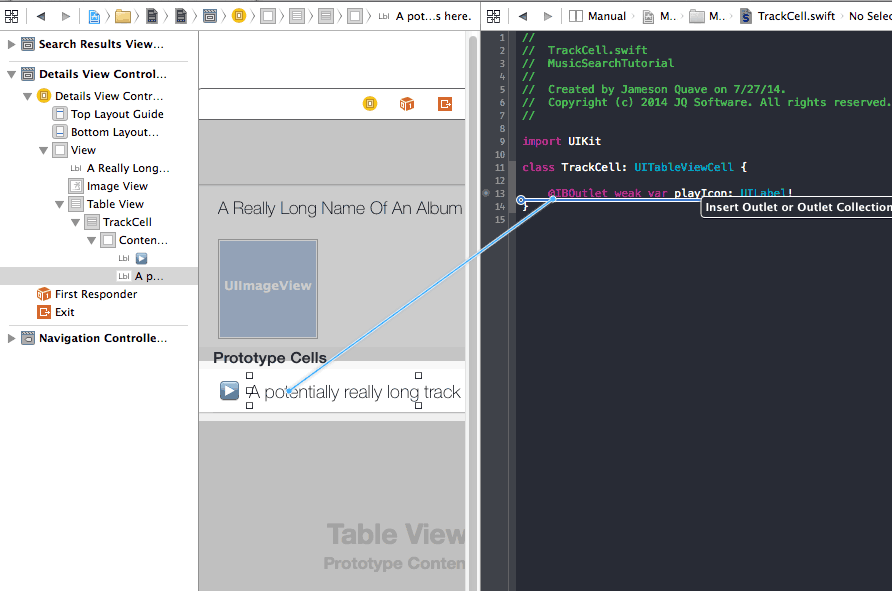
To demonstrate what the prototype cells are really for, I think we should add some custom controls to this one. Create a new Swift class called TrackCell that inherits from UITableViewCell, and give it two IBOutlet UILabels called playIcon and titleLabel.
Now, back in your Storyboard file. Change the prototype cell’s class to ‘TrackCell’ under the Identity Inspector in the right-hand panel.
Next, add two UILabel’s to the cell by dragging the views on to the cell itself. Put one on the left for our play/pause button, and one taking up most of the space on the right to say the title of the track.
Drag two labels on to the prototype cell. Make one of them small and on the left, around 23×23 points, for a ‘Play/Stop’ icon. The second one will be the track title and should take up the rest of the cell. Click in to your play button label and then in the Mac OS menu bar hit Edit->Emoji & Symbols and find a play button looking icon. I found some under Emoji->Objects & Symbols. As an optional challenge, try using an image for the button icon!
import UIKit
class TrackCell: UITableViewCell {
    @IBOutlet weak var playIcon: UILabel!
    @IBOutlet weak var titleLabel: UILabel!
}
When you’re done you should have a prototype cell looking something like this:

In the DetailsViewController, we can now implement the custom cells by getting the TrackCell object and casting it to our class with ‘as TrackCell’
func tableView(tableView: UITableView, cellForRowAtIndexPath indexPath: NSIndexPath) -> UITableViewCell {
    let cell = tableView.dequeueReusableCellWithIdentifier("TrackCell") as! TrackCell
    let track = tracks[indexPath.row]
    cell.titleLabel.text = track.title
    cell.playIcon.text = "YOUR_PLAY_ICON"
    return cell
}
The logic is mostly the same as our other table view, with the exception that we cast cell to our custom class, TrackCell, on the first line. The “YOUR_PLAY_ICON” text should be replaced with the play icon, which again, you can get by hitting Edit->Emoji & Symbols in the Mac OS menu bar. Don’t forget to put quotes around it!
Next we grab the track we need from our tracks array, just as before with albums.
Finally we access our custom IBOutlet variable, titleLabel, set it’s text to be the track title, and do the same with playIcon.
Congrats on getting this far, we’re in the home stretch!
Play some music
Okay, next we want to set up a way to actually hear some audio. We’re going to use the MPMoviePlayerController class to do this. It’s easy to work with, and works just fine with audio-only streams.
First off, in our DetailsViewController class let’s add the mediaPlayer as a property, right under the class definition add:
var mediaPlayer: MPMoviePlayerController = MPMoviePlayerController()
ERROR! Use of undeclared type MPMoviePlayerController.
It’s okay, this is just because we need to import the framework MediaPlayer, it isn’t included by default in our project.
Just add the following to the top of your DetailsViewController:
import MediaPlayer
Next, let’s kick off the audio playing when a user selects one of the track’s rows. Add the following to our DetailsViewController:
func tableView(tableView: UITableView, didSelectRowAtIndexPath indexPath: NSIndexPath) {
    var track = tracks[indexPath.row]
    mediaPlayer.stop()
    mediaPlayer.contentURL = NSURL(string: track.previewUrl)
    mediaPlayer.play()
    if let cell = tableView.cellForRowAtIndexPath(indexPath) as? TrackCell {
        cell.playIcon.text = "YOUR_STOP_ICON"
    }
}
The line mediaPlayer.stop() stop’s the currently playing track. If there isn’t one playing, nothing happens. We don’t want to play multiple tracks at once so let’s make sure we stop a track if another one is clicked 🙂
Next, mediaPlayer.contentURL sets a url for where the media player should load it’s content. In our case it’s from the url stored in track.previewUrl.
Finally, we call mediaPlayer.play(), and get the track cell for the tapped row index.
If this row is still visible, it’ll set ‘cell’ and here we can change the playIcon label to instead show the stopped icon, which we set again by using Edit->Emoji & Symbols on the Mac OS menu bar.
If you run your app, you should now have a fully working iTunes music preview application! This by itself is pretty great, but let’s add one more thing to make it even more slick, some smooth table view cell animations.
Adding Animations
This is actually really easy, and has a very cool visual effect.
All we’re going to do is add the following function to both our SearchResultsViewController, and our DetailsViewController:
func tableView(tableView: UITableView, willDisplayCell cell: UITableViewCell, forRowAtIndexPath indexPath: NSIndexPath) {
    cell.layer.transform = CATransform3DMakeScale(0.1,0.1,1)
    UIView.animateWithDuration(0.25, animations: {
        cell.layer.transform = CATransform3DMakeScale(1,1,1)
        })
}
Now run the app and scroll around, neat right?
So how’s it work?
The function willDisplayCell is called from the TableView delegate, similar to the rest of our callback functions that set up the row. But this one is only called the moment before a cell appears on-screen, either through initial loading or through scrolling.
cell.layer.transform = CATransform3DMakeScale(0.1,0.1,1)
This first line uses CATransform3DMakeScale() to create a transform matrix that scales down any object in x, y, and z. If you are familiar with linear algebra you’ll know what this means right away. If not, it’s not super important. The point is, it makes things scale, and here we’re scaling it down to 10% by setting the x and y values to 0.1.
So, we are basically just setting the cell layer’s transform to be 90% smaller.
Next we set the cell layer’s transform to a new scale, this time of (1,1,1). This just means that it should return to it’s original scale. Because this line is run inside of the animateWithDuration() block, we get the animation for free courtesy of Core Animation.
Experienced Obj-C developers will probably recognize this is not the only way to perform such an animation. However, I believe this method is the easiest to understand, in addition to being the most Swifty.
In my upcoming book I go in to great detail about how to efficiently use Core Animation to make beautiful animations for your apps. Using Core Animation in this way really makes your app pop.
The full source code for this section is available here.
A reader of this tutorial series contributed the next section, which covers producing a nicer play/pause icon purely in code. Check it out here.
Make sure to sign up to be notified of the next tutorial series.
Cool Tutorial!
For the MediaPlayer part, I just added “Import MediaPlayer” in DetailsViewController.swift and then everything go all right.
I even removed the Link Binary With Libraries later and it still worked.
Oh awesome! I had some mixed results doing that.
First of all, thanks for the nice, well organized tutorial.
I’ve been following throughout the entire tutorial so far, and I just came across a problem where the two UILabel ‘s inside TrackCell do not show up.
It’s weird because it does not cause any runtime error, and if I tap on any of the TableViewCell, it plays preview of the music as intended.
I also checked in the debugger by setting the breakpoint, it actually executes the lines where I set ‘cell.titleLabel.text’ and ‘cell.playIcon.text”.
Is there any possible pitfall you can think of while following that specific part of your tutorial?
Thank you.
Yes, there is a 99% chance this is caused by an AutoLayout or Size Class issue. Check at the bottom of your storyboard file and play around with the size class settings, you might notice your labels disappear or move to unexpected places under certain settings.
I fixed it by deleting the entire DetailsViewController from Storyboard, and then recreating it.
Thanks a lot!
Hey guys, I got the same issue in Xcode 6 Beta 5. I solved by it by re-entering Class in Storyboard. For example you have “ABCViewController” there. You have to erase it -> UIViewController and input it again -> ABCViewController. Hope it helps.
I had got the exact problem on simulators, just nothing was shown up inside TrackCell but it was clickable and playable.
Then I put it on real iPhone and it worked. Seems the simulators need improvement.
I hit the same problem…and then spent hours in the storyboard trying different constraints across the scene, changing view properties, sizes, deleting and recreating the custom cell several times over, you name it. It worked OK if I changed the cell type to Subtitle but using Custom meant that the text fields wouldn’t display properly. Exactly the same happened when using Jameson’s project from github.
Possibly an xCode 8 bug but eventually, I resolved the problem with a custom table cell xib and left the Details View Controller Scene just containing the Table View.
Another possible solution is checking “Installed” for the Any | Any size class. This is most likely a Xcode 6 issue that’ll be resolved in the final release. But doing the above has helped some people.
I was able to fix this by using a non-custom cell. Rather I used a left detail cell that produced a similar result.
I think it must be a bug in XCode where the custom cell has a cell height that’s quite small.
this solved my problem
http://ww4.sinaimg.cn/large/411c128agw1ej7ga0xghcj209k03xt8w.jpg
http://ww4.sinaimg.cn/large/411c128agw1ej7gabuf36j207103imx3.jpg
Hi, also thanks from me. I have done parts 1-6 and learned a lot, but now I am stuck with this same issue in Part 7. No content for the labels showing up, and playing with the Size Class doesn’t help.
So I thought to download the Part 7 project to see if that would work and to use as a starting point for analysis. I downloaded the ZIP file. When I double click on the .xcodeproj file it opens in Xcode, but when I try to run the project it fails with “2014-06-16 09:49:14.731 TestSwift[27131:1733609] Unknown class SearchResultsViewController in Interface Builder file”.
I am clueless as how to solve this, even after searching for the error on Internet. Can you help? Thanks a lot.
I assume your class is called something other than SearchResultsViewController. Maybe you left it’s name ‘ViewController’. Whatever class name you’re using needs to be represented in the storyboard file as the class for the view controller.
Maybe it was, or Xcode had an inconsistent state (I was working with your code downloaded, as far as I could tell). I cleaned out everything and reinstalled, and now it works with your code.
I can report that with me, your original code for Part 7 does not show icons in the detail view in the simulator, the same as some others have reported. Playing with size class does not solve the issue. Presumably, an Xcode beta issue that hopefully will be fixed eventually.
Thanks again, and looking forward to next installments and to your book.
Thanks for your tutorial. I followed every step as you showed, but it did not work when I click item in search results view controller scene. Then I download your full code and just run it again, the same error comes:
“Terminating app due to uncaught exception ‘NSUnknownKeyException’, reason: ‘[ setValue:forUndefinedKey:]: this class is not key value coding-compliant for the key detailsTextView.’
”
Can you help to fix this? Thanks!
detailsTextView is removed from the file. Your error is probably coming from the storyboard. Make sure you don’t have outlets set for detailsTextView in the storyboard by clicking on the DetailsViewController object inside the storyboard, going to the last pane of the right-hand-side property pane, and disconnecting anything connected to detailsTextView
Good tutorial!
I had to add a property to DetailsViewController:
var indexOfTrackPlaying : NSIndexPath? = nil
to make it reload the cell that stops playing as well as the one that starts playing.
func tableView(tableView: UITableView!, didSelectRowAtIndexPath indexPath: NSIndexPath!) {
var track = tracks[indexPath.row]
var indexPathThatWasPlaying : NSIndexPath? = nil
if let cell = tableView.cellForRowAtIndexPath(indexPath) as? TrackCell {
if(trackPlaying(indexPath)) {
cell.playIcon.text = playIcon
stopPlayingTrack()
}
else {
cell.playIcon.text = stoppedIcon
indexPathThatWasPlaying = stopPlayingTrack()
mediaPlayer.contentURL = NSURL(string: track.previewUrl)
mediaPlayer.play()
indexOfTrackPlaying = indexPath
}
var paths : NSIndexPath[] = [indexPath]
if (indexPathThatWasPlaying? != nil)
{
paths = [indexPath, indexPathThatWasPlaying!]
}
tableView.reloadRowsAtIndexPaths(paths, withRowAnimation: UITableViewRowAnimation.None)
}
}
func stopPlayingTrack() -> NSIndexPath?
{
mediaPlayer.stop()
var indexPathThatWasPlaying = indexOfTrackPlaying
indexOfTrackPlaying = nil
return indexPathThatWasPlaying
}
func trackPlaying(indexPath: NSIndexPath) -> Bool {
return (indexOfTrackPlaying? != nil) && (indexOfTrackPlaying! == indexPath)
}
Hey thanks for this, I posted a similar solution in the code: https://github.com/jquave/Swift-Tutorial/blob/Part7/TestSwift/Classes/DetailsViewController.swift
I decided to not include it in the tutorial and let people do it as an exercise themselves, keeps the tutorial more lean.
How would I go about determining when the track has finished playing and then change the symbol back to stop also?
ps. I think the link to your github is dead?
PS. Adding a UITableView to the UIViewController (instead of using a UITableViewController) means you have to manually hook up the datasource and delegate.
Without this no data will be shown in the DetailsViewController.
The link below shows you how but in XCode6 you drag it to the “yellow box icon” of the DetailsViewController in the Storyboard.
http://stackoverflow.com/questions/11068498/connect-uitableview-datasource-delegate-to-base-uiviewcontroller-class
Another great tutorial. Thanks for taking the time.
Probably nit-picking, but there are a couple of lines in your code where, in the println() command you have missed the backslash, hence the output will not be the error message.
e.g. from the above: println(“ERROR: (error.localizedDescription)”)
If people are typing from scratch, they might not notice. Hope you don’t mind me letting you know.
PS. In Xcode 6, I seem to having problems with the sizing of the UIViewControllers using Storyboards. Whilst I’m using Size Classes and setting it to Compact | Any, it seems to giving a screen size shorter than the actual screen of an iPhone 5 (if you know what I mean). Any ideas?
I got “dyld: Symbol not found: _OBJC_CLASS_$_NSURLConnection” error by just adding “import QuartzCore” into SearchResultsViewController (without adding the animation statements yet) AND running on physical iPhone5.
It works flawlessly, even with the animation statements, on Simulator, though. Do you have the same issue?
A few thoughts…
* I found it really difficult to create the custom cell and drag two labels onto it. I guess I got waylaid by choosing “static content” rather than “dynamic content” (was that it?) and didn’t understand what was happening. Got there in the end more by luck than design.
* In earlier code, you’d written “var cell = tableView.dequeueReusableCellWithIdentifier(kCellIdentifier); if cell == nil {cell = UITableViewCell}”. But in this code you only call the dequeueReusableCellWithIdentifier(“TrackCell”)…
So which is it? Will the dequeue function ever return nil (in which case how does the DetailsView work)? Or will dequeue never return nil (in which case why did you check for it in the main view)?
* I’ve been following your tutorials, but using AutoLayout. Most of it has gone well. But I’ve been completely bamboozled by the “Table View: has ambiguous scrollable content” errors. If you ever update this with Auto Layout, I’d love to see it!
Yeah video tutorials would be best for storyboarding topics.
kCellIdentifier is just a static string, which is equal to “TrackCell”. Turning string references like this in to static variables is common practice in iOS in order to reduce the chance of misspellings or issues when renaming something like this.
I haven’t seen the ambiguous scrollable content errors, maybe you could send me a link to your code? I’d be interested to see what’s causing that.
I’m not asking about kCellIdentifier vs “TrackCell”. That’s clear.
I’m asking: will “dequeueReusableCellWithIdentifier” ever return nil? If true, then the tutorial from earlier will fail because it fails to account for the nil possibility. If false, then the current tutorial has superfluous code because it checks whether it got back a nil value.
(The ambiguous scrollable content is an error from interface builder. If you’d like to see my project, with IB producing this error, I’d be delighted to send it to you! I don’t know your email address. Mine is lu at wischik dot com)
Good Job!!
Definitely helped me out,Thanks!
Thanks for your tutorial and sorry for my english xDD
But I have a question…
When the program loads, the data from the table appear blank.
But when we interact with the application (scroll, etc…), the data appear
How do I display the content once the load?
I’ve found the answer xDD
another one of those cases of “you do not find the answer in any way, then asks a question, but soon finds the answer”
In the method code “didReceiveAPIResults”
replace this “self.tableView.reloadData()”
for this ”
dispatch_async(dispatch_get_main_queue(), {
self.tableView.reloadData()
})
“
Thanks for a nice tutorial.
There seems to be a problem with the tableview in the detailsViewController.
The rows in the tableview will sometime add multiple subviews in the same cell, thus having overlapping text.
This effectually also reduces the number of cells in the table as you scroll.
It is also a problem in IOS 7 https://stackoverflow.com/questions/18588441/tableview-cell-custom-type-text-overlaps-itself-or-is-blank
Seems to be a problem with the reuse of cells that have a custom class, since it is not present in the SearchResultsViewController tableview.
Any ideas to what could be the issue.
I’m having the same issue – only on the Custom UITableViewCell. The track list will have overlapping cells once scrolled. Any idea why?
I just renewed my iOS developer license and found that the overlapping issue doesn’t happen when running the app on my device (iOS version 7.1.2) so I’m guessing this is an Xcode/Simulator bug?
Hi,
thanks for you great tutorial !
I just wondering :
if(!trackTitle) {
trackTitle = “Unknown”
}
else if(!trackPrice) {
println(“No trackPrice in \(trackInfo)”)
trackPrice = “?”
}
else if(!trackPreviewUrl) {
trackPreviewUrl = “”
}
Why using else if here ? If the track doesn’t have either name, either price or either preview, it seems good if the user know that. Because in your case, only one problem will be shown.
Otherwise, beautiful tutorial !
> Let’s now connect this new TableView to a property in DetailsViewController called tracksTableView.
it called “detailsTrackView” in your code
> @IBOutlet weak var detailsTrackView: UITableView!
Thanks for your great tutorial !
I’ve follow from 1-7, but today I always got this error
func tableView(tableView: UITableView!, cellForRowAtIndexPath indexPath: NSIndexPath!) -> UITableViewCell! {
let cell:TrackCell = tableView.dequeueReusableCellWithIdentifier(“TrackCell”) as TrackCell
var track = self.tracks[indexPath.row]
println(cell.titleLabel) // this will print nil
// will get this error when running
// fatal error: unexpectedly found nil while unwrapping an Optional value
…
}
maybe I missed something, or did something wrong.
any idea what’s going on here ?
figured out, missing Outlets of the TrackCell.
http://ww3.sinaimg.cn/large/411c128agw1ej7ft85ny8j207606mweo.jpg
Awesome tutorial. Can’t wait to see the book!
I have a problem w/ the prototype cell TrackCell in DetailsViewController. When I run it, it doesn’t show the playIcon and the other label at all. Unlike some of the earlier comments, I can’t play the music. I set a breakpoint in tableView( … numberOfRowsInSection) and it didn’t stop. In fact, none of tableView methods was executed. Pretty sure I followed the tutorial closely. I just don’t have clue about where I could have missed sth. Any help would be appreciated!
Most likely the delegate/dataSource of the tableview is not set
yup, that’s it.
followed Paul’s post and made it work
thanks again!
hi quave i have followed your tutorial and it is very helpful for beginners. i’m on a situation to fetch data from postgres database for user login page. could you guide me how that would be possible in swift for iOS.
You would want to write a server-side API, and use that API using the methods described in my tutorial 🙂
hello
Thanks for taking time to make these tutorials. They are a nice resource for swift newbies like me.
I have a quick question on a small issue, hopefully you can point me in the right direction on how to solve it…
So I made the tableviewcontroller in swift, and would like to insert it into an existing, older objective-c based project. Thru storyboard I have connected the old home page view (objC) to the new tableview (swift) via a button. When I run the app however, Xcode says that the swift based tableviewcontroller is unknown class.
Is there a specific step I missed in trying to insert swift in the obj-c project?
Thanks
You probably just need to use the module name (project name typically)
So like instead of MyClassName, you would say MyProjectName.MyClassName
But, it’s hard to determine without seeing the actual code :/
Nice tutorial. I downloaded the latest master branch (part 7) from Github and had to change a few small syntax changes. I used the auto-suggest to fix all issues.
The code runs fine, but I noticed that in landscape view, when you scroll to the bottom, there are still a few rows hidden. You can scroll down to see them, but once one you remove your finger/thumb from the screen, it goes back up there or for rows. It’s not quite as bad on portrait, but doesn’t completely show the entire last row.
Also, in landscape, the animation only works when scrolling down.
I’m still working through that tutorial, so haven’t quite got a change to compare the code in the tutorial vs the code in Github. And wonder if any of the auto-suggest corrections might have caused the issue.
Thanks!
No this is just some auto-layout stuff that I kept clear of in this tutorial. In a production app you would want to be more careful to pin the corners of your views using constraints.
I compile 7 and need to fix a few !/?. It worked. Then when I try to incorporate the way it was called, it worked as well but licensing wise can I use those few infrastructure part and the concept. Nothing to do with iTune or song or album. Just those how to async./delegate/pass URL. Seems all right reserved. As my project would be open sourced and hence may have to re-program it somehow. Not sure how as it is very generic thing?
You have my full permission to re-use this code any way you like. It’s public information 🙂
Great tuts. on part 7 – everything is working great in the emulator, but on my device (iphone 6 os 8.1.1) the audio doesn’t play. it makes the request just fine, but no playback on the device. Any ideas?
thanks!
I connected some head phones and could hear audio. Then when i took them out it started to play through the device speakers…must be a little bug. – everything is working now!
Just a quick thank for these great tutorials which are with bug benefits for beginners such like me,
Many thanks
Thank you so much for these tutorials. I’ve gone through 1 to 6 with relative ease.
In this 7th tutorial, the section “Adding a Custom Table View Cell” is quite confusing. It appears to repeat a few steps and also isn’t as easy to follow step-by-step as the other tutorials are. I’m actually stuck at the end of the section and cannot complete it. Any way to make it easier for a newbie to follow?
Thanks!
Thanks a lot for this awesome tutorial series 🙂
Hi Jameson, great job!
I’ve learned a lot from your tutorials. Thank you very much!
I added a snip code to Part7, when user didDeselect the playing row, stop playing and change the icon to ▶︎.
func tableView(tableView: UITableView, didDeselectRowAtIndexPath indexPath: NSIndexPath) {
if let cell = tableView.cellForRowAtIndexPath(indexPath) as? TrackCell {
cell.playIcon.text = “▶︎”
mediaPlayer.stop()
}
}
Ana mode the code in didSelectRowAtIndex a little change, so user can tap again to stop playing.
func tableView(tableView: UITableView, didSelectRowAtIndexPath indexPath: NSIndexPath) {
var track = tracks[indexPath.row]
var playIcon = “◼︎”
var willStop: Bool = false
if mediaPlayer.playbackState == .Playing {
playIcon = “▶︎”
willStop = true
}
mediaPlayer.contentURL = NSURL(string: track.previewUrl)
if !willStop {
mediaPlayer.play()
}
if let cell = tableView.cellForRowAtIndexPath(indexPath) as? TrackCell {
cell.playIcon.text = playIcon
}
}
Thanks again!
Hi,
Thx for all, that enabled me to learn :).
I continued with a little custom and animations, if someone want (Open Source and MIT licence)
https://github.com/weareopensource/Sample-Swift_GetStarted
I would probably do another branch with a TabBar
Just rename the repo : https://github.com/weareopensource/Sample-iOS_Swift_GetStarted