Caffe2 in an iOS App Deep Learning Tutorial
At this years’s F8 conference, Facebook’s annual developer event, Facebook announced Caffe2 in collaboration with Nvidia. This framework gives developers yet another tool for building deep learning networks for machine learning. But I am super pumped about this one, because it is specifically designed to operate on mobile devices! So I couldn’t resist but start digging in immediately.
I’m still learning, but I want to share my journey in working with Caffe2. So, in this tutorial I’m going to show you step by step how to take advantage of Caffe2 to start embedding deep learning capabilities in to your iOS apps. Sound interesting? Thought so… let’s roll 🙂
Building Caffe2 for iOS
The first step here is to just get Caffe2 built. Mostly their instructions are adequate so I won’t repeat too much of it here. You can learn how to build Caffe2 for iOS here.
The last step for their iOS install process is to run build_ios.sh, but that’s about where they leave you off with the instruction. So from here, let’s take a look at the build artifacts. The core library for Caffe2 on iOS is located inside the caffe2 folder:
- caffe2/libCaffe2_CPU.a
And in the root folder:
- libCAFFE2_NNPACK.a
- libCAFFE2_PTHREADPOOL.a
Create an Xcode project
Now that the library was built, I created a new iOS app project in Xcode with a single-view template. From here I drag and drop the libCaffe2_CPU.a file in to my project heirarchy along with the other two libs, libCAFFE2_NNPACK.a and libCAFFE2_PTHREADPOOL.a. Select ‘Copy’ when prompted. The file is located at caffe2/build_ios/caffe2/libCaffe2_CPU.a. This pulls a copy of the library in to my project and tells Xcode I want to link against the library. We need to do the same thing with protobuf, which is located in caffe2/build_ios/third_party/protobuf/cmake/libprotobuf.a.
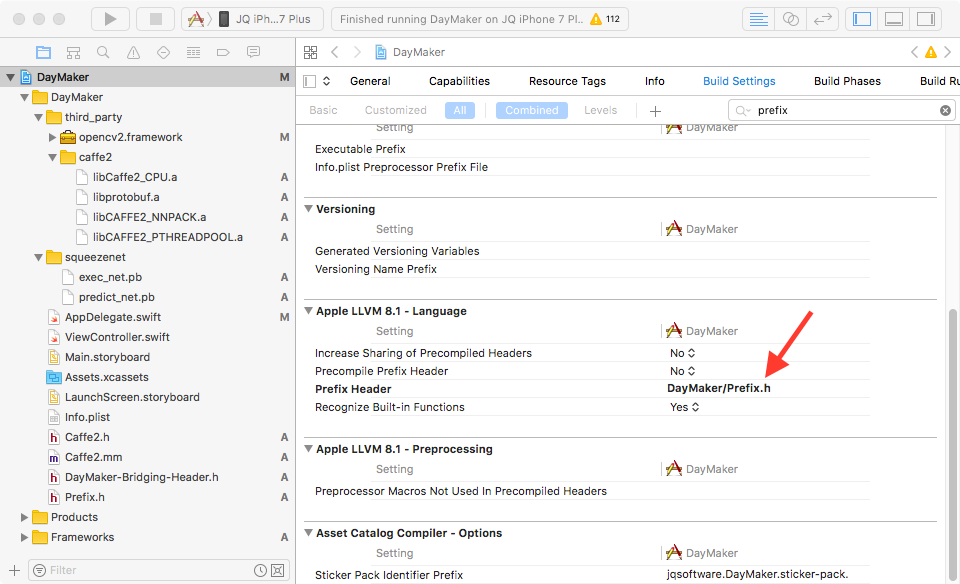
In my case I wanted to also include OpenCV2, which has it’s own requirements for setting up. You can learn about how to install OpenCV2 on their site. The main problem I ran in to with OpenCV2 was figuring out that I needed to create a Prefix.h file, and then in the settings of the project set the Prefix Header file to be MyAppsName/Prefix.h. In my example project I called the project DayMaker, so for me it was DayMaker/Prefix.h. Then I could put the following in the Prefix.h file so that OpenCV2 would get included before any Apple headers:
#ifdef __cplusplus #import <opencv2/opencv.hpp> #import <opencv2/stitching/detail/blenders.hpp> #import <opencv2/stitching/detail/exposure_compensate.hpp>#endif |

Include the Caffe2 headers
In order to actually use the library, we’ll need to pull in the right headers. Assuming you have a directory structure where your caffe2 files are a level above your project. (I cloned caffe2 in to ~/Code/caffe2 and set up my project in ~/Code/DayMaker.) You’ll need to add the following User Header Search Path in your project settings:
$(SRCROOT)/../caffe2$(SRCROOT)/../caffe2/build_ios |
You’ll also need to add the following to “Header Search Paths”
$(SRCROOT)/../caffe2/build_host_protoc/include$(SRCROOT)/../caffe2/third_party/eigen |
Now you can also try importing some caffe2 C++ headers in order to confirm it’s all working as expected. I created a new Objective-C class to wrap the Caffe2 C++ API around. To follow along, create a new Objective-C class called Caffe2. Then rename the Caffe2.m file it creates to Caffe2.mm. This causes the compiler to see this as Objective-C++ instead of just Objective-C, a requirement for making this all work.
Next, I added some Caffe2 headers to the .mm file. At this point this is my entire Caffe2.mm file:
#import "caffe2/core/context.h"#import "caffe2/core/operator.h"#import "Caffe2.h"@implementation Caffe2@end |
According to this Github issue a reasonable place to start with a C++ interface to the Caffe2 library is this standalone predictor_verifier.cc app. So let’s expand the Caffe2.mm file to include some of this stuff and see if everything works on-device.
With a few tweaks we can make a class that loads up the caffe2 environment and loads in a set of predict/net files. I’ll pull in the files from Squeezenet on the Model Zoo. Copy these in to the project heirarchy, and we’ll load it up just like any iOS binary asset…
//// Caffe2.m// DayMaker//// Created by Jameson Quave on 4/22/17.// Copyright © 2017 Jameson Quave. All rights reserved.//#import "Caffe2.h"// Caffe2 Headers#include "caffe2/core/flags.h"#include "caffe2/core/init.h"#include "caffe2/core/predictor.h"#include "caffe2/utils/proto_utils.h"// OpenCV#import <opencv2/opencv.hpp>namespace caffe2 { void run(const string& net_path, const string& predict_net_path) { caffe2::NetDef init_net, predict_net; CAFFE_ENFORCE(ReadProtoFromFile(net_path, &init_net)); CAFFE_ENFORCE(ReadProtoFromFile(predict_net_path, &predict_net)); // Can be large due to constant fills VLOG(1) << "Init net: " << ProtoDebugString(init_net); LOG(INFO) << "Predict net: " << ProtoDebugString(predict_net); auto predictor = caffe2::make_unique<Predictor>(init_net, predict_net); LOG(INFO) << "Checking that a null forward-pass works"; Predictor::TensorVector inputVec, outputVec; predictor->run(inputVec, &outputVec); NSLog(@"outputVec size: %lu", outputVec.size()); NSLog(@"Done running caffe2"); }}@implementation Caffe2- (instancetype) init { self = [super init]; if(self != nil) { [self initCaffe]; } return self;}- (void) initCaffe { int argc = 0; char** argv; caffe2::GlobalInit(&argc, &argv); NSString *net_path = [NSBundle.mainBundle pathForResource:@"exec_net" ofType:@"pb"]; NSString *predict_net_path = [NSBundle.mainBundle pathForResource:@"predict_net" ofType:@"pb"]; caffe2::run([net_path UTF8String], [predict_net_path UTF8String]); // This is to allow us to use memory leak checks. google::protobuf::ShutdownProtobufLibrary();}@end |
Next, we can just instantiate this from the AppDelegate to test it out… (Note you’ll need to import Caffe2.h in your Bridging Header if you’re using Swift, like me.
#import "Caffe2.h" |
In AppDelegate.swift:
func application(_ application: UIApplication, didFinishLaunchingWithOptions launchOptions: [UIApplicationLaunchOptionsKey: Any]?) -> Bool { // Instantiate caffe2 wrapper instance let caffe2 = Caffe2() return true} |
This for me produced some linker errors from clang:
[F operator.h:469] You might have made a build error: the Caffe2 library does not seem to be linked with whole-static library option. To do so, use -Wl,-force_load (clang) or -Wl,--whole-archive (gcc) to link the Caffe2 library. |
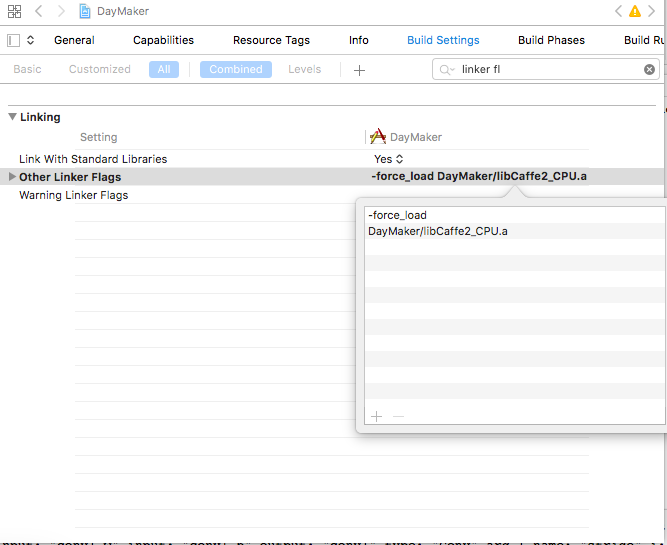
Adding -force_load DayMaker/libCaffe2_CPU.a as an additional linker flag corrected this issue, but then it presented an issue not being able to find opencv. The DayMaker part will be your project name, or just whatever folder your libCaffe2_CPU.a file is located in. This will show up as two flags, just make sure theyre in the right order and it should perform the right concatenation of the flags.

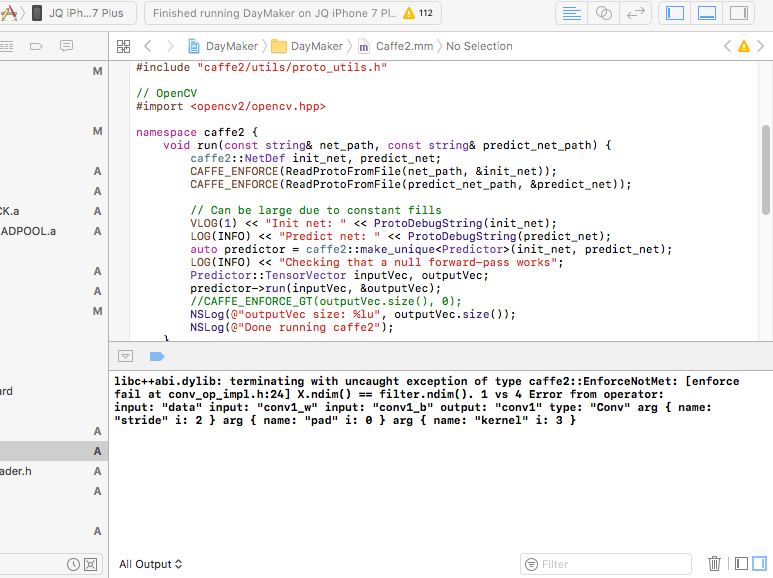
Building and running the app crashes immediately with this output:
libc++abi.dylib: terminating with uncaught exception of type caffe2::EnforceNotMet: [enforce fail at conv_op_impl.h:24] X.ndim() == filter.ndim(). 1 vs 4 Error from operator: input: "data" input: "conv1_w" input: "conv1_b" output: "conv1" type: "Conv" arg { name: "stride" i: 2 } arg { name: "pad" i: 0 } arg { name: "kernel" i: 3 } |
Success! I mean, it doesn’t look like success jut yet, but this is an error coming from caffe. The issue here is just that we never set anything for the input. So let’s fix that by providing data from an image.

Loading up some image data
Here you can add a cat jpg to the project or some similar image to work with, and load it in:
UIImage *image = [UIImage imageNamed:@"cat.jpg"]; |
I refactored this a bit and moved my logic out in to a predictWithImage method, as well as creating the predictor in a seperate function:
namespace caffe2 { void LoadPBFile(NSString *filePath, caffe2::NetDef *net) { NSURL *netURL = [NSURL fileURLWithPath:filePath]; NSData *data = [NSData dataWithContentsOfURL:netURL]; const void *buffer = [data bytes]; int len = (int)[data length]; CAFFE_ENFORCE(net->ParseFromArray(buffer, len)); } Predictor *getPredictor(NSString *init_net_path, NSString *predict_net_path) { caffe2::NetDef init_net, predict_net; LoadPBFile(init_net_path, &init_net); LoadPBFile(predict_net_path, &predict_net); auto predictor = new caffe2::Predictor(init_net, predict_net); init_net.set_name("InitNet"); predict_net.set_name("PredictNet"); return predictor; }} |
The predictWithImage method is using openCV to get the GBR data from the image, then I’m loading that in to Caffe2 as the inputVector. Most of the work here is actually done in OpenCV with the cvtColor line…
- (NSString*)predictWithImage: (UIImage *)image predictor:(caffe2::Predictor *)predictor { cv::Mat src_img, bgr_img; UIImageToMat(image, src_img); // needs to convert to BGR because the image loaded from UIImage is in RGBA cv::cvtColor(src_img, bgr_img, CV_RGBA2BGR); size_t height = CGImageGetHeight(image.CGImage); size_t width = CGImageGetWidth(image.CGImage); caffe2::TensorCPU input; // Reasonable dimensions to feed the predictor. const int predHeight = 256; const int predWidth = 256; const int crops = 1; const int channels = 3; const int size = predHeight * predWidth; const float hscale = ((float)height) / predHeight; const float wscale = ((float)width) / predWidth; const float scale = std::min(hscale, wscale); std::vector<float> inputPlanar(crops * channels * predHeight * predWidth); // Scale down the input to a reasonable predictor size. for (auto i = 0; i < predHeight; ++i) { const int _i = (int) (scale * i); printf("+\n"); for (auto j = 0; j < predWidth; ++j) { const int _j = (int) (scale * j); inputPlanar[i * predWidth + j + 0 * size] = (float) bgr_img.data[(_i * width + _j) * 3 + 0]; inputPlanar[i * predWidth + j + 1 * size] = (float) bgr_img.data[(_i * width + _j) * 3 + 1]; inputPlanar[i * predWidth + j + 2 * size] = (float) bgr_img.data[(_i * width + _j) * 3 + 2]; } } input.Resize(std::vector<int>({crops, channels, predHeight, predWidth})); input.ShareExternalPointer(inputPlanar.data()); caffe2::Predictor::TensorVector input_vec{&input}; caffe2::Predictor::TensorVector output_vec; predictor->run(input_vec, &output_vec); float max_value = 0; int best_match_index = -1; for (auto output : output_vec) { for (auto i = 0; i < output->size(); ++i) { float val = output->template data<float>()[i]; if(val > 0.001) { printf("%i: %s : %f\n", i, imagenet_classes[i], val); if(val>max_value) { max_value = val; best_match_index = i; } } } } return [NSString stringWithUTF8String: imagenet_classes[best_match_index]];} |
The imagenet_classes are defined in a new file, classes.h. It’s just a copy from the Android example repo here.
Most of this logic was pulled and modified from bwasti’s github repo for the Android example.
With these changes I was able to simplify the initCaffe method as well:
- (void) initCaffe { NSString *init_net_path = [NSBundle.mainBundle pathForResource:@"exec_net" ofType:@"pb"]; NSString *predict_net_path = [NSBundle.mainBundle pathForResource:@"predict_net" ofType:@"pb"]; caffe2::Predictor *predictor = caffe2::getPredictor(init_net_path, predict_net_path); UIImage *image = [UIImage imageNamed:@"cat.jpg"]; NSString *label = [self predictWithImage:image predictor:predictor]; NSLog(@"Identified: %@", label); // This is to allow us to use memory leak checks. google::protobuf::ShutdownProtobufLibrary();} |
So you’ll notice I’m pulling in the cat.jpg here. I used this cat pic:

The output when running on iPhone 7:
Identified: tabby, tabby cat
Hooray! It works on a device!
I’m going to keep working on this and publishing what I learn. If that sounds like something you want to follow along with you can get new posts in your email, just join my mobile development newsletter. I’ll never spam you, just keep you up-to-date with deep learning and my own work on the topic.
Thanks for reading! Leave a comment or contact me if you have any feedback 🙂
Side-note: Compiling on Mac OS Sierra with CUDA
When compiling for Sierra as a target (not the iOS build script, but just running make) I ran in to a problem in protobuf that is related to this issue. This will only be a problem if you are building against CUDA. I suppose it’s somewhat unusual to do so because most Mac computers do not have NVIDIA chips in them, but in my case I have a 2013 MBP with an NVIDIA chip that I can use CUDA with.
To resolve the problem in the most hacky way possible, I applied the changes found in that issue pull. Just updating protobuf to the latest version by building from source would probably also work… but this just seemed faster. I open up my own version of this file in /usr/local/Cellar/protobuf/3.2.0_1/include/google/protobuf/stubs/atomicops.h and just manually commented out lines 198 through 205:
// Apple./*#elif defined(GOOGLE_PROTOBUF_OS_APPLE)#if __has_feature(cxx_atomic) || _GNUC_VER >= 407#include <google/protobuf/stubs/atomicops_internals_generic_c11_atomic.h>#else // __has_feature(cxx_atomic) || _GNUC_VER >= 407#include <google/protobuf/stubs/atomicops_internals_macosx.h>#endif // __has_feature(cxx_atomic) || _GNUC_VER >= 407*/ |
I’m not sure what the implications of this are, but it seems to be what they did in the official repo, so it must not do much harm. With this change I’m able to make the Caffe2 project with CUDA support enabled. In the official version of protobuf used by tensorflow, you can see this bit is actually just removed, so it seems to be the right thing to do until protobuf v3.2.1 is released, where this is fixed using the same approach.

Awesome post Jameson! Thanks a lot for making it available so soon after the release of Caffe2. I was able to follow the post smoothly, until “Adding -force_load DayMaker/libCaffe2_CPU.a as an additional linker flag corrected this issue, but then it presented an issue not being able to find opencv.” As you mentioned, Xcode complains about not being able to find opencv. How did you solve that problem? I didn’t see it in the post…
Oh I figured out how to resolve the problem. I was using OpenCV 3.0 for iOS when getting the problem. It disappeared after I switch to OpenCV 2.4. Thanks again for your post!
Hi,
how did you solve the OpenCV problem after adding -force_load?
Thanks
That was the only issue for me, are you seeing something else happen?
I was able to resolve it after switching to OpenCV 2.4 from 3.0.
Oh, you’re totally right I used OpenCV 2.4 for this. It wasn’t neccessarily a pro-active choice, it’s just what I happened to have used.
Thanks so much for the note! It looks really nice.
I think you might be interested in the metal backends – we have some cmake challenges and sync challenges to make things work and automatically built with Caffe2 yet, but you can have a sneak peek at this PR: https://github.com/caffe2/caffe2/pull/215 .
Again, thanks so much!
Thanks Yangqing, I’ll definitely be researching the metal code 🙂
caffe2::NetDef::ParseFromArray has an upper limit of 64 MB on the data.
If anyone hits this, a workaround I found is to do this:
const int maxCodedStreamMemoryInBytes = 350000000;
const int warnCodedStreamMemoryInBytes = 350000000;
google::protobuf::io::ArrayInputStream aiStream(buffer, len);
google::protobuf::io::CodedInputStream ciStream(&aiStream);
ciStream.SetTotalBytesLimit(maxCodedStreamMemoryInBytes, warnCodedStreamMemoryInBytes);
CAFFE_ENFORCE(net->ParseFromCodedStream(&ciStream));
This may cause memory issues for iPhone though (depending on the model)
Thanks Michael, I had no idea! Does this also apply to the other methods of parsing?
I feel like I’ve very close…but I’m getting errors about OpenCV. I’m trying to add the 2.4.13.2 iOS framework. I tried following a combination of their instructions from (http://docs.opencv.org/2.4/doc/tutorials/ios/hello/hello.html) and this blog. But I’m still getting errors. My Prefix.h file has an error with:
/Users/spbryfczynski/Documents/Projects/Architecture/sandbox/spbryfczynski/caffe2app/caffe2app/Prefix.h:2:13: ‘opencv2/opencv.hpp’ file not found
I’ve included the Prefix.h file in my build settings. Not sure why its not finding the appropriate files.
Anybody else run into this issue or has a suggestion? Thanks!
Make sure to add your folder containing opencv2 folder as a user header search path in the project’s settings.
I am not familiar to the development of ios, e.g., I do not understand how to create Caffe2.h. Are you going to release this demo on github? Thanks very much.
Sure, I can do that. But all you have to do is hit File->New File and pick a template. For the h file and mm file you would choose Objective-C, and then rename it to end in .mm instead of .m.
I got the same problem.I know how to creat an empty .h, but I don’t know the content of Caffe2.h in your turtoial.It seems that caffe2.h be used in many place. I really confused. Thank a lot!
Yes, what is in the Caffe2.h file? I was also wondering about this.
The following definition should be good enough for the Caffe2 object:
#import
#ifndef Caffe2_h
#define Caffe2_h
@interface Caffe2 : NSObject
@end
#endif /* Caffe2_h */
Hi! Thank you for your article! Just trying to install Caffe2, but the last step is failed for me 🙁
Have you met similar error while running the script from last step?
Alexs-iMac:caffe2-master alexkosyakov$ ./scripts/build_ios.sh
Caffe2 codebase root is: /Users/alexkosyakov/Downloads/caffe2-master
Build Caffe2 ios into: /Users/alexkosyakov/Downloads/caffe2-master/build_ios
Building protoc
CMake Error: The source directory “/Users/alexkosyakov/Downloads/caffe2-master/third_party/protobuf/cmake” does not exist.
Specify –help for usage, or press the help button on the CMake GUI.
Thanks for any thoughts! 🙂
‘brew install cmake’ will resolve this issue
I assume this is a Caffe2 build issue. You probably wanna reinstall cmake to make it work (most straightforward method I think).
I met this issue before too and solved by just reinstall cmake.
https://github.com/KleinYuan/Caffe2-iOS#caffe2-ios-build-failed
A small note to anyone facing issues with UIImageToMat function, make sure you add this statement to your code:
#import
I was facing issues with this function and spent a couple of hours googling this up.
From opencv 2.4.6 on this functionality is already included. Just include
opencv2/highgui/ios.h
In OpenCV 3 this include has changed to:
opencv2/imgcodecs/ios.h
Thanks for the tutorial. Is there a github repo for this demo?
Hi! So strange but I am constantly get error while compile project:
/сaffe2/caffe2/utils/math.h:20:10: ‘Eigen/Core’ file not found
On this page I mentioned that you must add the header search paths, just check that you’ve added that and that the files are present.
Thanks for the tutorial! My two cents on running it with simulator, “IOS_PLATFORM=SIMULATOR ./scripts/build_ios.sh” can be used to build the libs for simulator. Also based on https://github.com/caffe2/caffe2/issues/298#issuecomment-296848769, “-DUSE_NNPACK=OFF” needs to be passed in as an option for cmake, and libCAFFE2_NNPACK.a won’t get built (things still work with three .a files)
Is this still a valid way to use a caffe2 model in iOS?