This post has been updated for compatibility with XCode 8 and iOS 10
Local notifications are a simple way to display information to your user even when your app is in the background. They allow you to display an alert, play a sound or badge your app’s icon. Local notifications can be triggered at a scheduled time or when your user enters or leaves a geographical area. In this tutorial, we’ll create a simple to-do list application and delve into a number of UILocalNotification features and quirks.
Note: There is an updated API that I have done an additional video tutorial for here:
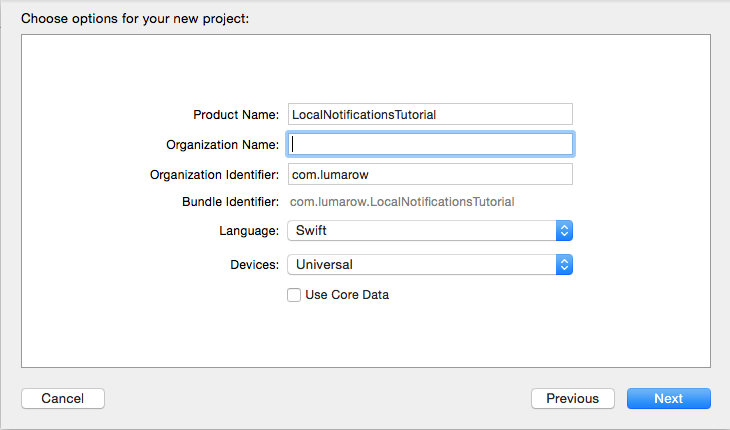
First, let’s create a new single view application in Xcode and call it LocalNotificationsTutorial. Remember to choose Swift as the language.
Before we delve into writing any code, let’s get our view controllers and views set up. This is a necessary step, and I’ll be covering some of the basics of using Interface Builder, but if want to skip it and jump right into dealing with scheduling notifications you can follow along by getting the configured application from here.
Configuring the Views
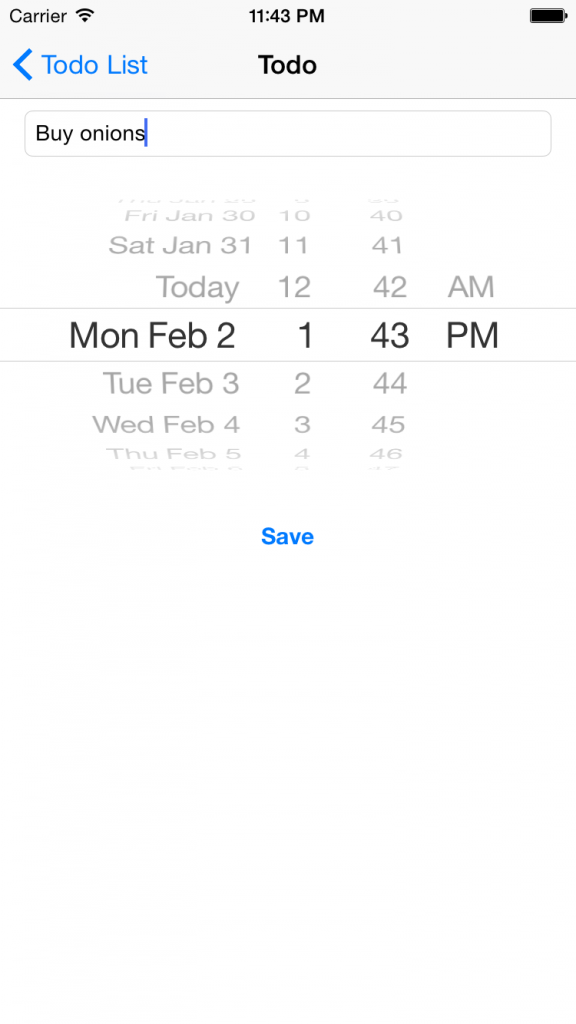
Our finished application will have two views in a navigation controller: a root view that displays a chronologically ordered list of to-do items with deadlines, and a view for creating to-do list items.
Creating the View Controllers
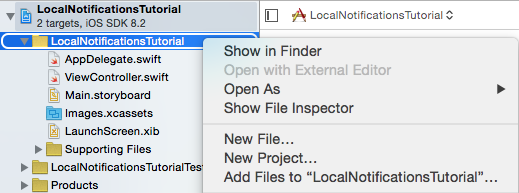
Before opening Interface Builder, we should generate view controllers to back each of our views. Ctrl or right-click on the project group in the project navigator and select “New File”.
Select “Cocoa Touch Class” from the “iOS -> Source” menu and create a subclass of UITableViewController named “TodoTableViewController”. Don’t create a XIB file, and, of course, the language should be Swift. This will be our root view controller and it will be in charge of displaying the to-do list.
– Also read about: Field Scheduling.
We need a separate view for creating our to-do items. Repeat the process, this time create a UIViewController subclass and name it “TodoSchedulingViewController”.
Setting up Navigation
Now that our view controllers are created, let’s hook them into our project’s storyboard. Click “Main.storyboard” and delete the root view controller. Go ahead and delete “ViewController.swift” as well. We won’t be using it.
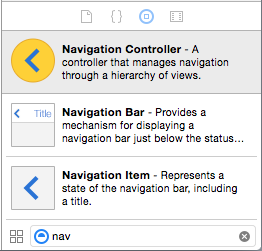
Drag a new navigation controller from the object library onto the now blank storyboard. We’ve deleted our root view, so drag a Storyboard Entry Point onto the navigation controller so our application will have a root view.
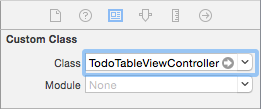
Select the navigation controller’s root view (a table view) and set its custom class to “TodoTableViewController” in the identity inspector.
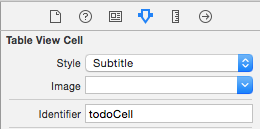
Since we’re going to display deadlines for each to-do item, we need to select the table view’s first (and only) prototype cell, switch to the attributes inspector, and set the cell’s style to “Subtitle”. It needs a reuse identifier as well, so we can refer to it in our code. We’ll use “todoCell”.
Keep the attributes inspector selected. Drag a navigation item onto the table view and give it the title “Todo List”, then drag a bar button item onto that and set the identifier to “Add”.
Now we’ll set up the view on which users can schedule and title their to-do items. Drag a view controller into the storyboard. Its custom class should be set to “TodoSchedulingViewController”.
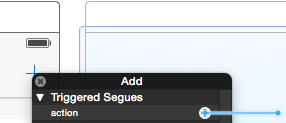
Ctrl or right-click on the “Add” button, drag from the “action” to the new view, and select “show”. Now all our navigation is linked up.
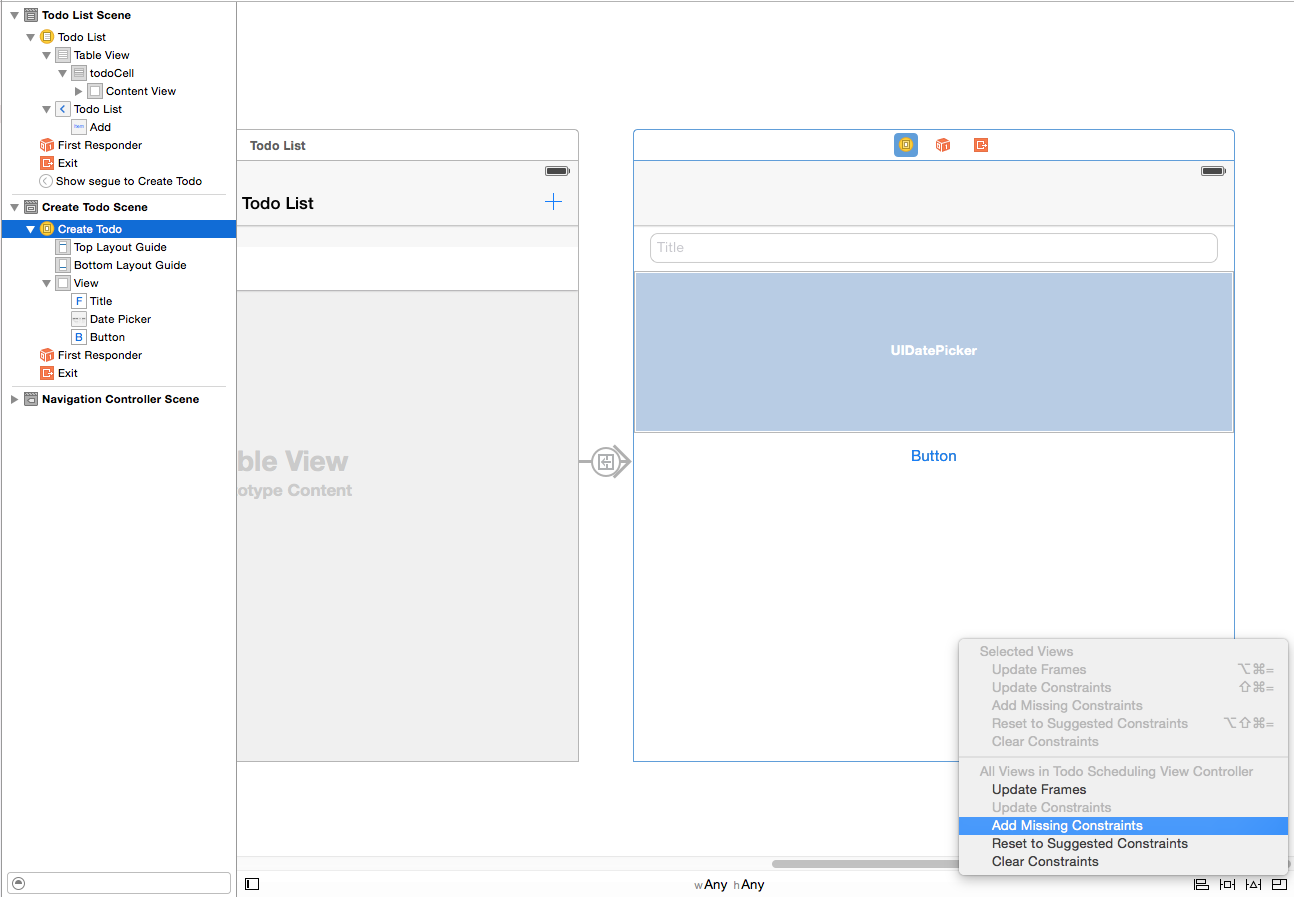
We need to drag three controls onto this view: a text field (with “Title” as the placeholder text), a date picker and a button (titled “Save”). Just center and widen all three, then “add missing constraints” to all views in the view controller (Under “Resolve Auto Layout Issues”, the triangle icon towards the bottom right of Xcode). Adding constraints ensures that the view is laid out predictably across various screen sizes (instead of having portions of controls cut off or misaligned).
Connecting Controls to Code
Now that our views and navigation are laid out, we have to link our text field and date picker controls to an IBOutlet in TodoSchedulingViewController.swift. This will allow us to access these controls (and their values) in our code. There are a few ways to do this, but the simplest is to enable the Assistant editor by clicking the interlocking circles in the top right of XCode, Ctrl or right-click the control, and drag the “New Referencing Outlet” circle into the TodoSchedulingViewController class body.
Do this for both the text field and the date picker, naming them “titleField” and “deadlinePicker” respectively.
@IBOutlet weak var titleField: UITextField!
@IBOutlet weak var deadlinePicker: UIDatePicker!
The final step is to connect the save button to an IBAction (an event handler function). Just Ctrl or right-click the button, and drag from the “Touch Up Inside” circle to the code window. Name the action “savePressed” and optionally set the sender type to UIButton (no other controls will be firing this action, so we can be more specific).
@IBAction func savePressed(_ sender: UIButton) {
}
The views and navigation for this project are all set up. Go ahead and run the app in the simulator. Try it for a few different devices. You’ll notice that, because of the constraints we added, your views stretch or squeeze to fit the various screen sizes.
Now, let’s get out of Interface Builder and write some code.
Registering Notification Settings
We need to register our intent to use notifications with the application. Otherwise, the notifications we schedule simply won’t fire. Switch over to your Application Delegate (AppDelegate.swift) and add the following line to application:didFinishLaunchingWithOptions:
application.registerUserNotificationSettings(UIUserNotificationSettings(types: [.alert, .badge, .sound], categories: nil))
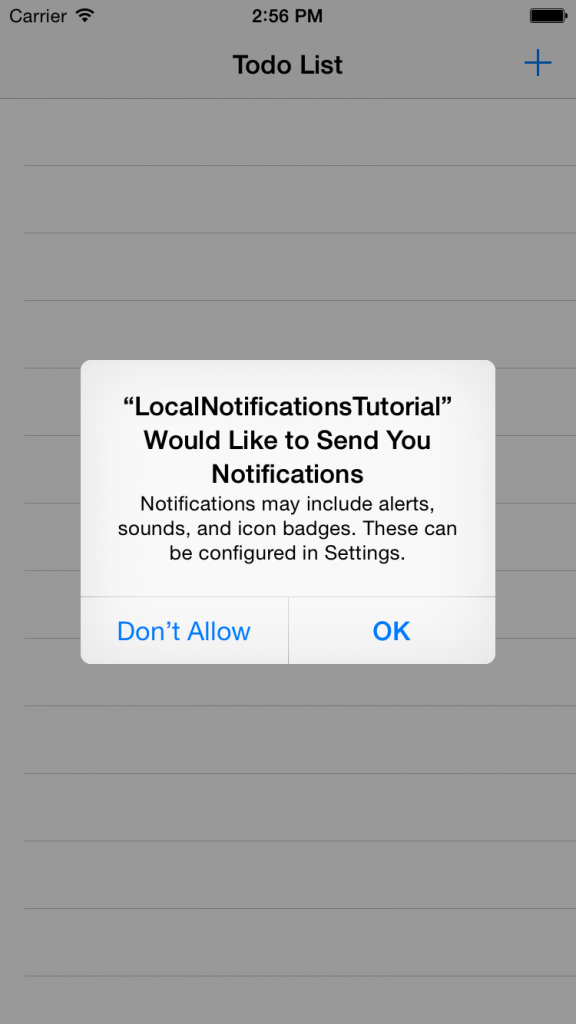
On the first launch of the app, users will now be prompted to allow your app to send notifications. If the user grants permission, we will be able to schedule notifications that display a banner, play a sound, and update our app icon’s badge number (which we’ll cover in part 2).
Modeling the Application
For a simple app like this, it may be tempting to handle all of the logic in the view controllers that we just created, but we’ll have an easier time understanding and maintaining our code if we keep the management of the to-do list and the presentation logic separate.
I chose to model individual to-do items with a lightweight struct. Let’s create that now. Just click “File -> New -> File”, choose “Swift File” and name it “TodoItem”. Each to-do list item has a title and a deadline, so we’ll create properties for both.
struct TodoItem {
  var title: String
  var deadline: Date
}
Ultimately, each to-do list item needs to be backed by an on disk representation, so that the list will persist if the application is terminated. Instances of UILocalNotification have a userInfo property – a dictionary that we can use to store miscellaneous data like the title, but we can’t rely on that alone in this case. Local notifications are automatically unscheduled after they are fired, which means that we wouldn’t be able to retrieve past-due items. We’ll have to use another method to persist our items, and we need a way to associate an item we’ve retrieved from the disk with its corresponding local notification. For that, we’ll use a universally unique identifier (UUID).
struct TodoItem {
    var title: String
    var deadline: Date
    var UUID: String

    init(deadline: Date, title: String, UUID: String) {
        self.deadline = deadline
        self.title = title
        self.UUID = UUID
    }
}
Since we’re going to display overdue items in red, lets also add a convenience method that returns whether or not an item is overdue.
var isOverdue: Bool {
    // Optionally, you can omit "ComparisonResult" and it will be inferred.
    return (Date().compare(self.deadline) == ComparisonResult.orderedDescending) // deadline is earlier than current date
}
Saving To-Do Items (Scheduling Notifications)
We need a class to represent the list of items and handle persisting them. Create a new Swift file named “TodoList”.
Our application is only concerned with maintaining a single to-do list, so it makes sense to make a single shared instance available throughout the app.
class TodoList {
    class var sharedInstance : TodoList {
        struct Static {
            static let instance: TodoList = TodoList()
        }
        return Static.instance
    }
}
This method is the community-accepted way to implement the singleton pattern in Swift, which you can adapt to your own projects. If you’re curious, you can read the details about what it’s doing and why in this Stack Overflow answer.
UserDefaults provides a simple way to persist our to-do items to disk. The following snippet defines a method that adds a dictionary representation of a to-do item to standard user defaults (with UUID as the key), and then creates the associated local notification.
fileprivate let ITEMS_KEY = "todoItems"
func addItem(_ item: TodoItem) {
    // persist a representation of this todo item in UserDefaults
    var todoDictionary = UserDefaults.standard.dictionary(forKey: ITEMS_KEY) ?? Dictionary() // if todoItems hasn't been set in user defaults, initialize todoDictionary to an empty dictionary using nil-coalescing operator (??)
    todoDictionary[item.UUID] = ["deadline": item.deadline, "title": item.title, "UUID": item.UUID] // store NSData representation of todo item in dictionary with UUID as key
    UserDefaults.standard.set(todoDictionary, forKey: ITEMS_KEY) // save/overwrite todo item list

    // create a corresponding local notification
    let notification = UILocalNotification()
    notification.alertBody = "Todo Item \"\(item.title)\" Is Overdue" // text that will be displayed in the notification
    notification.alertAction = "open" // text that is displayed after "slide to..." on the lock screen - defaults to "slide to view"
    notification.fireDate = item.deadline as Date // todo item due date (when notification will be fired) notification.soundName = UILocalNotificationDefaultSoundName // play default sound
    notification.userInfo = ["title": item.title, "UUID": item.UUID] // assign a unique identifier to the notification so that we can retrieve it later

    UIApplication.shared.scheduleLocalNotification(notification)
}
Notice that we’re just playing the default sound when the notification fires. You can provide your own sound file, but audio files over 30 seconds in length are not supported. The default sound will play instead.
We’re almost to the point where users can create new list items. It’s time to implement savePressed: in TodoSchedulingViewController.
@IBAction func savePressed(_ sender: UIButton) {
    let todoItem = TodoItem(deadline: deadlinePicker.date, title: titleField.text!, UUID: UUID().uuidString)
    TodoList.sharedInstance.addItem(todoItem) // schedule a local notification to persist this item
    let _ = self.navigationController?.popToRootViewController(animated: true) // return to list view
}
Note that, since this is a new to-do list entry, we’re passing in a newly generated UUID.
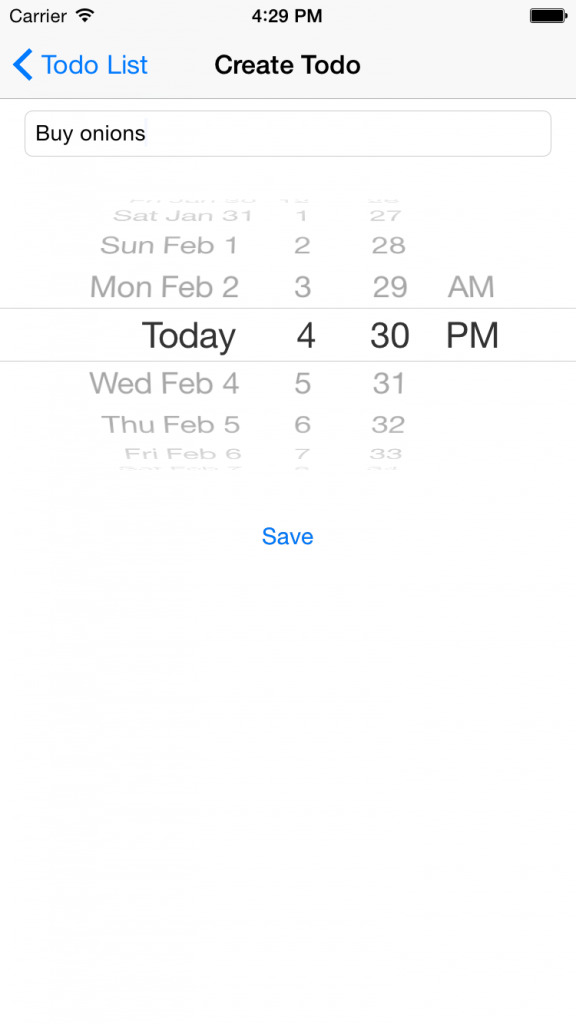
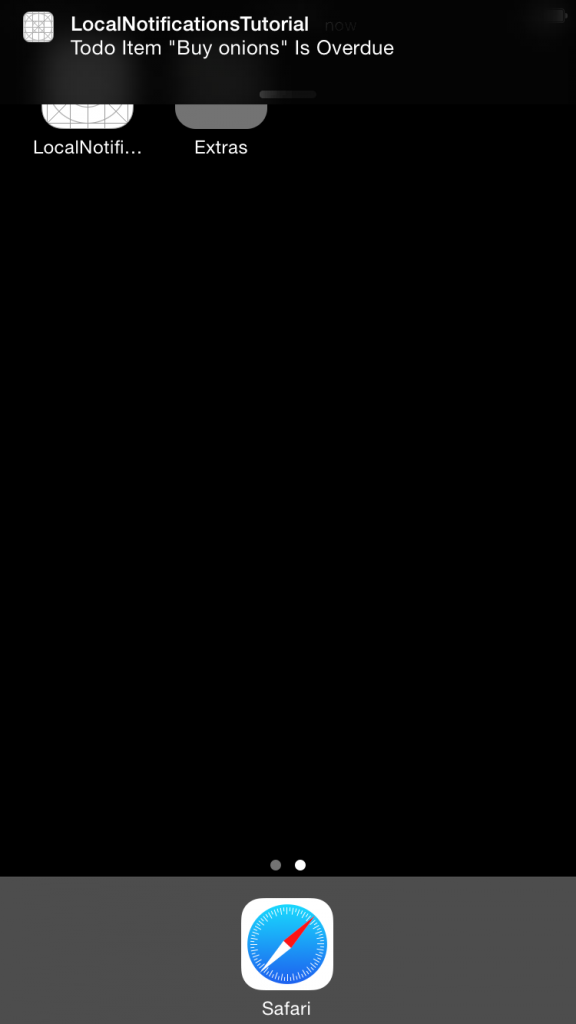
Try out the app now. Launch it in the simulator, create a new item due a minute in the future, and return to the home or lock screen (Shift-CMD-H or CMD-L) to view the notification. The notification won’t necessarily fire right on the stroke of the minute (due to a hidden ‘seconds’ value on the time picker control), but you’ll see it within the minute.
The 64 Notification Limit
It’s important to note that you’re limited to scheduling 64 local notifications. If you schedule more, the system will keep the 64 soonest firing notifications and automatically discard the rest.
We can avoid running into this issue by disallowing the creation of new items if 64 already exist.
In TodoTableViewController:
func refreshList() {
    todoItems = TodoList.sharedInstance.allItems()
    if (todoItems.count >= 64) {
        self.navigationItem.rightBarButtonItem!.enabled = false // disable 'add' button
    }
    tableView.reloadData()
}
Retrieving To-Do Items
The fact that to-do items are persisted as an array of dictionaries is an implementation detail that outside classes shouldn’t have to worry about. Our TodoList class needs a public facing function that the list view controller can query to retrieve a list of to-do items.
func allItems() -> [TodoItem] {
    let todoDictionary = UserDefaults.standard.dictionary(forKey: ITEMS_KEY) ?? [:]
    let items = Array(todoDictionary.values)
    return items.map({
        let item = $0 as! [String:AnyObject]
        return TodoItem(deadline: item["deadline"] as! Date, title: item["title"] as! String, UUID: item["UUID"] as! String!)
    }).sorted(by: {(left: TodoItem, right:TodoItem) -> Bool in
        (left.deadline.compare(right.deadline) == .orderedAscending)
    })
}
This function retrieves the array of item representation from disk, converts it to an array of TodoItem instances using an unnamed closure we pass to map, and sorts that array chronologically. Describing the map and sort functions in detail is beyond the scope of this tutorial, but you can find more information in the Swift language guide’s section on closures.
Now we can hook up TodoTableViewController to display the list.
class TodoTableViewController: UITableViewController {
    var todoItems: [TodoItem] = []
    override func viewDidLoad() {
        super.viewDidLoad()
    }

    override func viewWillAppear(_ animated: Bool) {
        super.viewWillAppear(animated)
        refreshList()
    }

    func refreshList() {
        todoItems = TodoList.sharedInstance.allItems()

        if (todoItems.count >= 64) {
            self.navigationItem.rightBarButtonItem!.enabled = false // disable 'add' button
        }
        tableView.reloadData()
    }

    override func numberOfSections(in tableView: UITableView) -> Int {
        return 1
    }

    override func tableView(_ tableView: UITableView, numberOfRowsInSection section: Int) -> Int {
        return todoItems.count
    }

    override func tableView(_ tableView: UITableView, cellForRowAtIndexPath indexPath: IndexPath) -> UITableViewCell {
        let cell = tableView.dequeueReusableCell(withIdentifier: "todoCell", for: indexPath) // retrieve the prototype cell (subtitle style)
        let todoItem = todoItems[(indexPath as NSIndexPath).row] as TodoItem
        cell.textLabel?.text = todoItem.title as String!
        if (todoItem.isOverdue) { // the current time is later than the to-do item's deadline
            cell.detailTextLabel?.textColor = UIColor.red
        } else {
            cell.detailTextLabel?.textColor = UIColor.black // we need to reset this because a cell with red subtitle may be returned by dequeueReusableCellWithIdentifier:indexPath:
        }

        let dateFormatter = DateFormatter()
        dateFormatter.dateFormat = "'Due' MMM dd 'at' h:mm a" // example: "Due Jan 01 at 12:00 PM"
        cell.detailTextLabel?.text = dateFormatter.string(from: todoItem.deadline as Date)
        return cell
    }
}
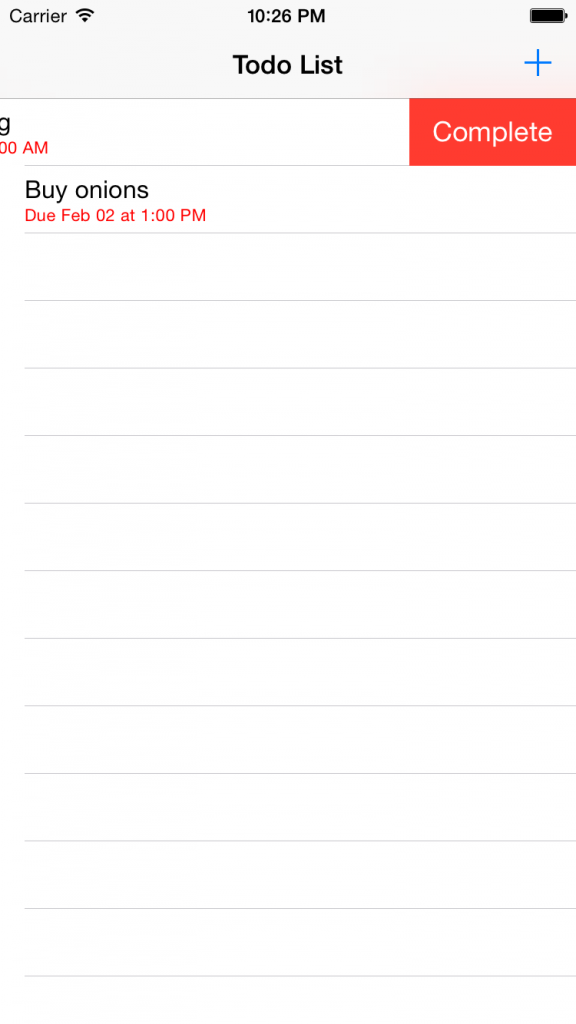
Our to-do list now shows each item in chronological order, with the date label in red if the item is overdue.
There are two issues we need to deal with here. Users currently don’t receive any visual feedback that a notification has fired (and a to-do item is overdue) when the app is running in the foreground. Also, when the app resumes, the list won’t automatically be refreshed, meaning that missed deadlines may not appear in red. Lets solve both issues now.
In TodoTableViewController:
override func viewDidLoad() {
    super.viewDidLoad()
    NotificationCenter.default.addObserver(self, selector: #selector(TodoTableViewController.refreshList), name: NSNotification.Name(rawValue: "TodoListShouldRefresh"), object: nil)
}
In AppDelegate:
func application(_ application: UIApplication, didReceive notification: UILocalNotification) {
    NotificationCenter.default.post(name: Notification.Name(rawValue: "TodoListShouldRefresh"), object: self)
}
func applicationDidBecomeActive(_ application: UIApplication) {
    NotificationCenter.default.post(name: Notification.Name(rawValue: "TodoListShouldRefresh"), object: self)
}
Please note that, despite the presence of the word “notification”, NotificationCenter is unrelated to UILocalNotification. NotificationCenter’s purpose is to provide a simple way to implement the observer pattern in your apps.
Here we register TodoTableViewController as an observer to the “TodoListShouldRefresh” notification. Whenever a notification with that name is posted, the reloadData method will be called.
I’ve omitted this step, but it is generally better to define notification names as static constants to avoid repeating yourself.
Completing To-Do Items (Canceling Notifications)
Our to-do list application isn’t very useful without a way to clear out completed items, and the simplest way to do that is to delete them. We need to add some functionality to TodoList.
func removeItem(_ item: TodoItem) {
    let scheduledNotifications: [UILocalNotification]? = UIApplication.shared.scheduledLocalNotifications
    guard scheduledNotifications != nil else {return} // Nothing to remove, so return

    for notification in scheduledNotifications! { // loop through notifications...
        if (notification.userInfo!["UUID"] as! String == item.UUID) { // ...and cancel the notification that corresponds to this TodoItem instance (matched
            UIApplication.shared.cancelLocalNotification(notification) // there should be a maximum of one match on UUID
            break
        }
    }

    if var todoItems = UserDefaults.standard.dictionaryForKey(ITEMS_KEY) {
        todoItems.removeValue(forKey: item.UUID)
        UserDefaults.standard.set(todoItems, forKey: ITEMS_KEY) // save/overwrite todo item list
    }
}
Note that passing an existing notification to scheduleLocalNotification: will cause a duplicate to be created. If you want to give users the ability to edit existing local notifications, you’ll need to retrieve the old one and cancel it before scheduling the new one.
Now we just need to allow users to remove items by swiping the item’s cell and pressing “Complete”.
In TodoTableViewController:
override func tableView(_ tableView: UITableView, canEditRowAt indexPath: IndexPath) -> Bool {
    return true // all cells are editable
}
override func tableView(_ tableView: UITableView, commit editingStyle: UITableViewCellEditingStyle, forRowAt indexPath: IndexPath) {
    if editingStyle == .delete { // the only editing style we'll support
        // delete the row from the data source
        let item = todoItems.remove(at: (indexPath as NSIndexPath).row) // remove TodoItem from notifications array, assign removed item to 'item'
        tableView.deleteRows(at: [indexPath], with: .fade)
        TodoList.sharedInstance.removeItem(item) // delete backing property list entry and unschedule local notification (if it still exists)
        self.navigationItem.rightBarButtonItem!.isEnabled = true // we definitely have under 64 notifications scheduled now, make sure 'add' button is enabled
    }
}
Conclusion
We now have a working to-do list application that lets our users schedule and cancel local notifications with sound and custom alert messages. The source code can be downloaded here.
In part 2 of this series, which builds on this project, we’ll add support for an application icon badge and learn about notification actions, a new feature that allows us to trigger code from a notification without ever opening the app.

On this portion of your code “return items.map({TodoItem(deadline: $0[“deadline”] as NSDate, title: $0[“title”] as String, UUID: $0[“UUID”] as String!)}).sorted({” Xcode is throwing an error that states:
“cannot invoke ‘sorted’ with an argument list of type ‘((_. _)->_)'”
Any idea how to fix it?
Did you delete my previous comment? It is gone. I will ask again. In this part of the above code:
“func allItems() -> [TodoItem] {
var todoDictionary = NSUserDefaults.standardUserDefaults().dictionaryForKey(ITEMS_KEY) ?? [:]
let items = Array(todoDictionary.values)
return items.map({TodoItem(deadline: $0[“deadline”] as NSDate, title: $0[“title”] as String, UUID: $0[“UUID”] as String!)}).sorted({
return ($0.deadline.compare($1.deadline) == .OrderedAscending)
})
}”
An error is being returned that says: cannot invoke ‘sorted’ with an argument list of type ‘((_. )->)
Anyway to correct this?
You need to change from sorted to sort method.
Any chance we can get an update to this tutorial for Xcode 7? There are numerous errors with this in Xcode 7.
Xcode 7 isn’t out of beta yet, so if you want to run on the beta you need to have a basic understanding of how to fix the issues. In the future it’ll be updated.
Hey,
Thanks for the great tutorial, really easy to follow and implement!
I was messing around with adding an alert for overdue items while the app is running, if others following are interested here is the code…
I added the following lines to didReceiveLocalNotification in App Delegate:
var alertMessage = “Todo item is overdue”
if let alertBody = notification.alertBody {
alertMessage = alertBody // If the notification has an alert message use that instead
}
if self.window?.rootViewController?.presentedViewController == nil { // Check that an alert is not currently displayed
var alert = UIAlertController(title: “Item Overdue”, message: alertMessage, preferredStyle: UIAlertControllerStyle.Alert)
alert.addAction(UIAlertAction(title: “OK”, style: UIAlertActionStyle.Default, handler: nil))
self.window?.rootViewController?.presentViewController(alert, animated: true, completion: nil)
}
Thanks
Will this tutorial be updated for Xcode 8/Swift 3 and iOS 10?
In xcode 8 this line of code: “return items.map({TodoItem(deadline: $0[“deadline”] as! Date, title: $0[“title”] as! String, UUID: $0[“UUID”] as! String!)}).sorted(by: {(left: TodoItem, right:TodoItem) -> Bool in” is giving the error “Type ‘Any’ has no subscript members.