Updated on September 20, 2014 for Xcode 6 GM
Using the AVFoundation API, we are going to set up a capture session and make an app that allows us to use all the new fine-grained controls added to iOS 8. This includes manually controlling focus, exposure, and ISO. First off, we just need to set up a basic camera preview. By the end of Part 1 we’ll have that in place along with a nifty way to control focus. This tutorial is adapted from the more detailed project PhotoSwapr in my book. Ready? Let’s get going…
Looking for something more in-depth than a tutorial? Try my book & video courses
Learn About My Book & Video Packages »
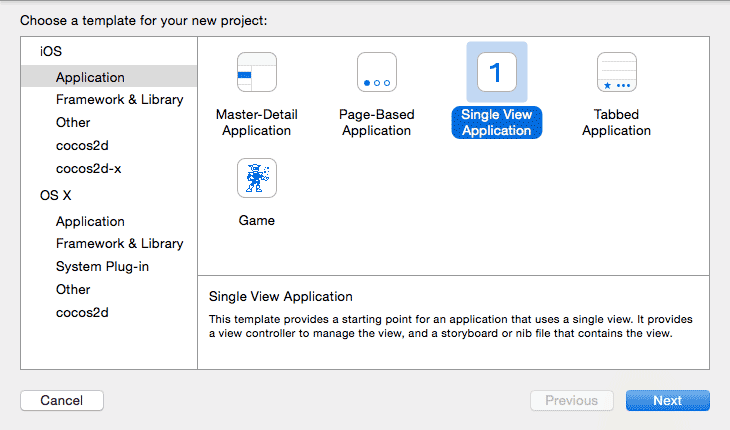
First off we’ll create a new Xcode Project using Swift as the language, and using the Single View template.
Now, in the ViewController.swift file we can start adding in our custom code inside of viewDidLoad().
First we create a AVCaptureSession object to work with. Let’s do this as a class variable.
let captureSession = AVCaptureSession()
This may give an error due to not being able to find AVCaptureSession. So near the top of the file make sure to add:
import AVFoundation
Now, in viewDidLoad let’s set our quality settings and find a device to record from.
First, let’s take a look at the list of devices available.
captureSession.sessionPreset = AVCaptureSessionPresetLow
let devices = AVCaptureDevice.devices()
println(devices)
Run this and you’ll see something like this:
[<AVCaptureFigVideoDevice: 0x16e7f720 [Back Camera][com.apple.avfoundation.avcapturedevice.built-in_video:0]>,
<AVCaptureFigVideoDevice: 0x16d91a00 [Front Camera][com.apple.avfoundation.avcapturedevice.built-in_video:1]>,
<AVCaptureFigAudioDevice: 0x16e88c00 [iPhone Microphone][com.apple.avfoundation.avcapturedevice.built-in_audio:0]>]
pple.avfoundation.avcapturedevice.built-in_video:1]>,
<AVCaptureFigAudioDevice: 0x16e88c00 [iPhone Microphone][com.apple.avfoundation.avcapturedevice.built-in_audio:0]>]
This is from my iPhone 5S. Looks like we have two microphones, and the front and back cameras. Cool. For our purposes let’s try and grab the back camera.
Let’s add this to a ViewController, and store the front facing camera if we find one
import UIKit
import AVFoundation

class ViewController: UIViewController {

    let captureSession = AVCaptureSession()

    // If we find a device we'll store it here for later use
    var captureDevice : AVCaptureDevice?

    override func viewDidLoad() {
        super.viewDidLoad()
        // Do any additional setup after loading the view, typically from a nib.
        captureSession.sessionPreset = AVCaptureSessionPresetLow

        let devices = AVCaptureDevice.devices()

        // Loop through all the capture devices on this phone
        for device in devices {
            // Make sure this particular device supports video
            if (device.hasMediaType(AVMediaTypeVideo)) {
                // Finally check the position and confirm we've got the back camera
                if(device.position == AVCaptureDevicePosition.Back) {
                    captureDevice = device as? AVCaptureDevice
                }
            }
        }

    }

}
After we set the captureDevice, let’s begin the session by implementing a function to start the session
if captureDevice != nil {
    beginSession()
}
…and later in the class we implement beginSession()…
func beginSession() {
    var err : NSError? = nil
    captureSession.addInput(AVCaptureDeviceInput(device: captureDevice, error: &err))

    if err != nil {
        println("error: \(err?.localizedDescription)")
    }

    previewLayer = AVCaptureVideoPreviewLayer(session: captureSession)
    self.view.layer.addSublayer(previewLayer)
    previewLayer?.frame = self.view.layer.frame
    captureSession.startRunning()
}
If you run the app on a device now, you should see a preview of the camera. This is pretty much just the standard iOS camera. Let’s now modify the focus mode. Add a new method called configureDevice() and have beginSession() call it on the first line starting the capture session.
func configureDevice() {
    if let device = captureDevice {
        device.lockForConfiguration(nil)
        device.focusMode = .Locked
        device.unlockForConfiguration()
    }
}
Add this method, it locks the device, sets the focus to locked, and then unlocks the device.
Run the app now and try tapping to focus on different parts of the scene. The default focus behavior should now be disabled. This means we can control the focus on our own. Let’s add a UISlider to control the focus.
Now, let’s add a manual focusTo function based on a value from 0.0 to 1.0
func focusTo(value : Float) {
    if let device = captureDevice {
        if(device.lockForConfiguration(nil)) {
            device.setFocusModeLockedWithLensPosition(value, completionHandler: { (time) -> Void in
                //
            })
            device.unlockForConfiguration()
        }
    }
}
First, we validate that the device exists, then we lock the device. If the lock is successful we call the setFocusModeLockedWithLensPosition() API to tell the lens to focus on the point ‘value’, which is passed in to the focusTo() method.
Now let’s implement touch controls using these methods:
let screenWidth = UIScreen.mainScreen().bounds.size.width
override func touchesBegan(touches: NSSet, withEvent event: UIEvent) {
    var anyTouch = touches.anyObject() as UITouch
    var touchPercent = anyTouch.locationInView(self.view).x / screenWidth
    focusTo(Float(touchPercent))
}

override func touchesMoved(touches: NSSet, withEvent event: UIEvent) {
    var anyTouch = touches.anyObject() as UITouch
    var touchPercent = anyTouch.locationInView(self.view).x / screenWidth
    focusTo(Float(touchPercent))
}
This just gets a value from 0.0 to 1.0 based on how far you are touching on the screen horizontally. Run the app now and slide a finger left to right on the screen. You can now manually control focus this way! Cool right?
Next time we’ll add an option for manually setting the ISO and exposure. But for now, this is a start. Make sure to subscribe to my newsletter to be notified of Part 2. Coming soon!
Want a deeper look at the AVFoundation API? Pre-order my upcoming book on developing iOS 8 Apps in Swift.
Here is the final code from this post:
import UIKit
import AVFoundation

class ViewController: UIViewController {

    let captureSession = AVCaptureSession()
    var previewLayer : AVCaptureVideoPreviewLayer?

    // If we find a device we'll store it here for later use
    var captureDevice : AVCaptureDevice?

    override func viewDidLoad() {
        super.viewDidLoad()

        // Do any additional setup after loading the view, typically from a nib.
        captureSession.sessionPreset = AVCaptureSessionPresetHigh

        let devices = AVCaptureDevice.devices()

        // Loop through all the capture devices on this phone
        for device in devices {
            // Make sure this particular device supports video
            if (device.hasMediaType(AVMediaTypeVideo)) {
                // Finally check the position and confirm we've got the back camera
                if(device.position == AVCaptureDevicePosition.Back) {
                    captureDevice = device as? AVCaptureDevice
                    if captureDevice != nil {
                        println("Capture device found")
                        beginSession()
                    }
                }
            }
        }

    }

    func focusTo(value : Float) {
        if let device = captureDevice {
            if(device.lockForConfiguration(nil)) {
                device.setFocusModeLockedWithLensPosition(value, completionHandler: { (time) -> Void in
                    //
                })
                device.unlockForConfiguration()
            }
        }
    }

    let screenWidth = UIScreen.mainScreen().bounds.size.width
    override func touchesBegan(touches: NSSet, withEvent event: UIEvent) {
        var anyTouch = touches.anyObject() as UITouch
        var touchPercent = anyTouch.locationInView(self.view).x / screenWidth
        focusTo(Float(touchPercent))
    }

    override func touchesMoved(touches: NSSet, withEvent event: UIEvent) {
        var anyTouch = touches.anyObject() as UITouch
        var touchPercent = anyTouch.locationInView(self.view).x / screenWidth
        focusTo(Float(touchPercent))
    }

    func configureDevice() {
        if let device = captureDevice {
            device.lockForConfiguration(nil)
            device.focusMode = .Locked
            device.unlockForConfiguration()
        }

    }

    func beginSession() {

        configureDevice()

        var err : NSError? = nil
        captureSession.addInput(AVCaptureDeviceInput(device: captureDevice, error: &err))

        if err != nil {
            println("error: \(err?.localizedDescription)")
        }

        previewLayer = AVCaptureVideoPreviewLayer(session: captureSession)
        self.view.layer.addSublayer(previewLayer)
        previewLayer?.frame = self.view.layer.frame
        captureSession.startRunning()
    }

}
When I implement the above code, or run your project from github for this the iOS simulator shows that launch screen “CameraTutorial” and then remains blank… Is it remaining blank because it is not detected a camera?
Oh you have to use the device! The simulator doesn’t have a camera (or a camera simulator for that matter)
It would be nice if the simulator just used your computers webcam, but alas… it does not :/
You need an app developer license or a enrollment from developer.apple.com and then pair the ID number from the developer side of apple to xcode 6.0 or later!
Do you have any tips for displaying the video “mirrored”?
Hi Jameson, I am struggling with barcode scanner in swift. I don’t know any objective-c and there is just tutorials using that language. So I am putting the pieces together with Capture Session and stuff, and I think that is the way. Would you be interested in making a tutorial about that??
Thanks!
I happen to have exactly this on a branch of this tutorial: https://github.com/jquave/CameraTutorial/tree/BarcodeScanner
Hi Jameson,
Thank you for producing this content. It has been very helpful to me.
No problem, glad you are finding it useful 🙂
Hi Jameson,
I’ve tried this (part 1) tutorial go yours and I think it’s very helpful. However, I’m using an iPad Mini instead of an iPhone and I was wondering if that’s the reason that the picture displayed on the screen is so blurry. Even with the focusTo() method implemented, the image goes from pixelated to blurry. Is that how the camera “preview” should look? Any idea why that is?
I’m sure it’s just not focusing right. Got a screenshot?
Hi Jameson,
Thanks for this tutorial.
But I’m getting an error at line captureSession.addInput(AVCaptureDeviceInput(device: captureDevice, error: &err)) as bellow:
Terminating app due to uncaught exception ‘NSInvalidArgumentException’, reason: ‘*** Can’t add a nil AVCaptureInput’
When debug I saw that captureDevice is NOT null.
Any idea?
Thank you so much!
Never mind I turned off permission accessing camera by accident 🙂
Hi,
I’m getting the following error:
1. Overriding method with selector ‘touchesBegan:withEvent:’ has incompatible type ‘(NSSet, UIEvent) -> ()’
2. ‘AnyObject?’ is not convertible to ‘UITouch’; did you mean to use ‘as!’ to force downcast?
Xcode 6.3
iPhone 6, iOs 8.3
The error is telling you how to fix this, change the “as” term to be “as!”.
Hello, I have the same two errors. I fixed the second one by changing “as” to “as!” How do I fix the first error? Xcode says “Method does not override any method from its superclass.” Thank you!
I have the same problem. The downcast is easy but I’m not sure how to work with the fact that “touches” is now an NSObject in the touchesBegan function.
Cast it to UITouch
Yeah, this is a problem.
Does anyone have a fix for this?
I have the same error but it says:
overriding method with selector ‘touchesBegan:withEvent:’ has incompatable type ‘(NSSet, UIEvent) -> ()
I changed th line
override func touchesBegan(touches: NSSet, withEvent event: UIEvent) {
to
override func touchesBegan(touches: Set, withEvent event: UIEvent) {
and it worked fine.
I tried that but now I need to supply generics for the set and both and aren’t working
Great tutorial, clean and direct… I am running into an issue that maybe you can help.
My app only runs in Landscape so when the camera preview loads it is spun 90 degrees counter-clockwise compared to Landscape.
Any simple way to adjust this for Landscape only Apps?
found this to work
previewLayer!.connection?.videoOrientation = AVCaptureVideoOrientation.LandscapeLeft
Thanks for that. What about Part 2?
Part 2 is here: http://jamesonquave.com/blog/taking-control-of-the-iphone-camera-in-ios-8-with-swift-part-2/
Absolutely great website and tutorials. It’s kinda funny to me how Swift kind of resembles Python (although that is the only language I really know right now lol). Thanks for sharing this with us; Jesus Christ Bless! 🙂
I have a problem when a build the project because swift change NSSet.
Update for new swift:
override func touchesBegan(touches: Set, withEvent event: UIEvent?) {
var anyTouch = touches.first as! UITouch!
//var anyTouch = touches.anyObject() as! UITouch
var touchPercent = anyTouch.locationInView(self.view).x / screenWidth
focusTo(Float(touchPercent))
}
Is it possible to put the video feed into an image view, so that it doesn’t have to take up the whole screen?
Thanks!
I tried running this but got an error on the touchesMoved and touchesBegan overrides claiming there was no compatible type for the parameters. Did I miss a step?
Thanks the comments are helping to solve all issues, thanks your post is really great.