Swift Tutorial
This tutorial updated to reflect changes in Xcode 8.3.1 and iOS 10, as of April 17, 2017
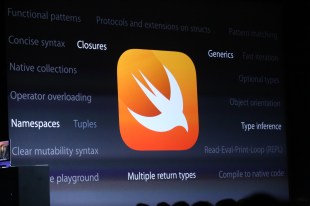
Apple announced at WWDC a major change to the way iOS apps are developed, it can now be done using a new programming language called Swift. In my efforts to adapt and learn the language’s common patterns and best practices, I will be posting regularly as I step through the learning process, sharing everything I find. I hope you decide to follow along!
In this tutorial we will build an iOS application that will pull down iTunes tracks from the iTunes web API (or application programming interface), display that information on the iPhone using a common UI element called a Table View, and finally allow us to drill down in to an album and play some of the tracks. If you are looking to develop your website further hire professional web development agency services, to help you. Web designers are in the business of selling web designs. That is the first principle of business for a web design firm, as it is for many other types of businesses. There is nothing new here except that the whole purpose of a web site is to create business for the owner, and a site just gathering dust does not do that. No one says that a web design needs to create direct sales for any business but it must connect with the business owner’s market and engage that market. If the site doesn’t connect with the market it is just junk collecting dust. It may be a beautiful piece of work but it’s still collecting dust. You can check this link right here now for the web design ottawa.
Tutorial Index
- Hello World (You are here!)
- Making a web API request and parsing the JSON
- Some best practices using Protocols and Delegates
- Adding an interactive Table View
- Async image loading and caching
- Interaction with multiple views
- Animations, Audio, and Custom Table View Cells
So I’m going to start with a pretty basic app and explain how the code works. Ready? Here we go…
The Basics
Swift opts to use a Javascript-like ‘var’ keyword to define any new variable.
So for example to create a new variable with a bit of text in it, you would have this:
var myString = "This is my string." |
This is declared with a var so the variable can change at any time, similar to most languages.
However the let keyword creates constants. These can not ever be changed once they are defined. If you try, a compiler error will appear and the program just won’t run.
let someConstant = 40 |
In this case kSomeConstant is implicitly defined as an integer, or Int. If you want to be more specific you can specify which type it is like so:
let someOtherConstant: Int = 40 |
With both arrays and dictionaries, they are described using brackets []
var colorsArray = ["Blue", "Red", "Green", "Yellow"]var colorsDictionary = ["PrimaryColor":"Green", "SecondaryColor":"Red"] |
You can access the members of an array with integer value indexes, and the members of a dictionary with String keys (or other types, but that’ll come in later tutorials)
let firstColor = colorsArray[0]// firstColor is now "Blue"let aColor = colorsDictionary["PrimaryColor"]// aColor is now "Green" |
There’s a lot more to go over, but I think these basics are important to get a start going on to the tutorial. So with that, let’s move on to Hello World. If you want to play around with this a bit yourself before getting going on our first iPhone App. Be sure to check out the Playground containing this sample code on Github.
Hello World

First, we’re going to write the simplest app imaginable to get started, Hello World. This segment comes directly from my upcoming book on Swift development, but it’s so important and fundamental to getting started I thought it would be good to release for free here.
Our app will only do one thing: print “Hello World” to the console. You’ll need a developer copy of Xcode in order to follow along, which requires a developer account. If you have one, head on over to http://developer.apple.com and get your copy before we begin.
So now you’ve got your IDE set up. Let’s write hello world out to the console. This example demonstrates the simplest app that can be built, and more importantly shows that you’re environment is set up correctly.
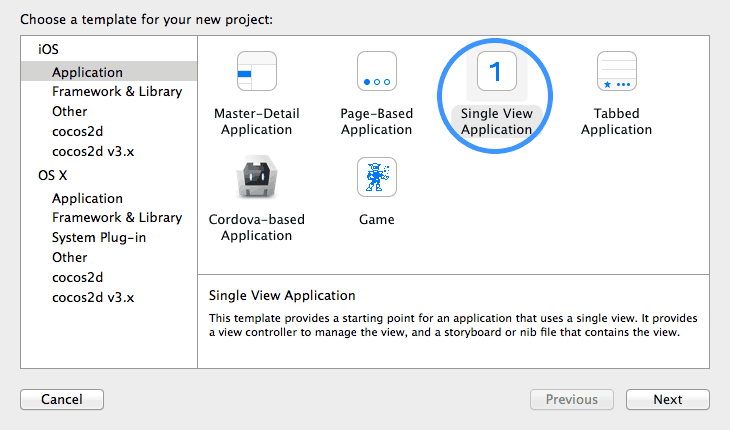
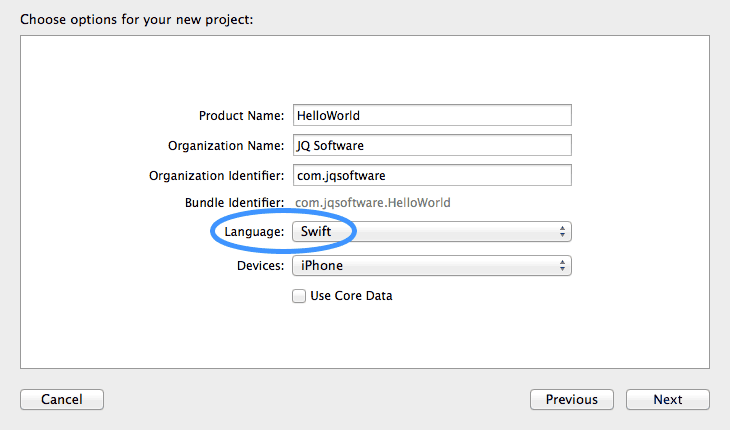
Set up an Xcode project using the single-view application template, and make sure you opt for Swift as the language.
You should now find an AppDelegate.swift file in the project hierarchy. Inside of this file find the line that says:
"// Override point for customization after application launch." |
Replace this line with our amazing hello world code:
print("Hello World") |
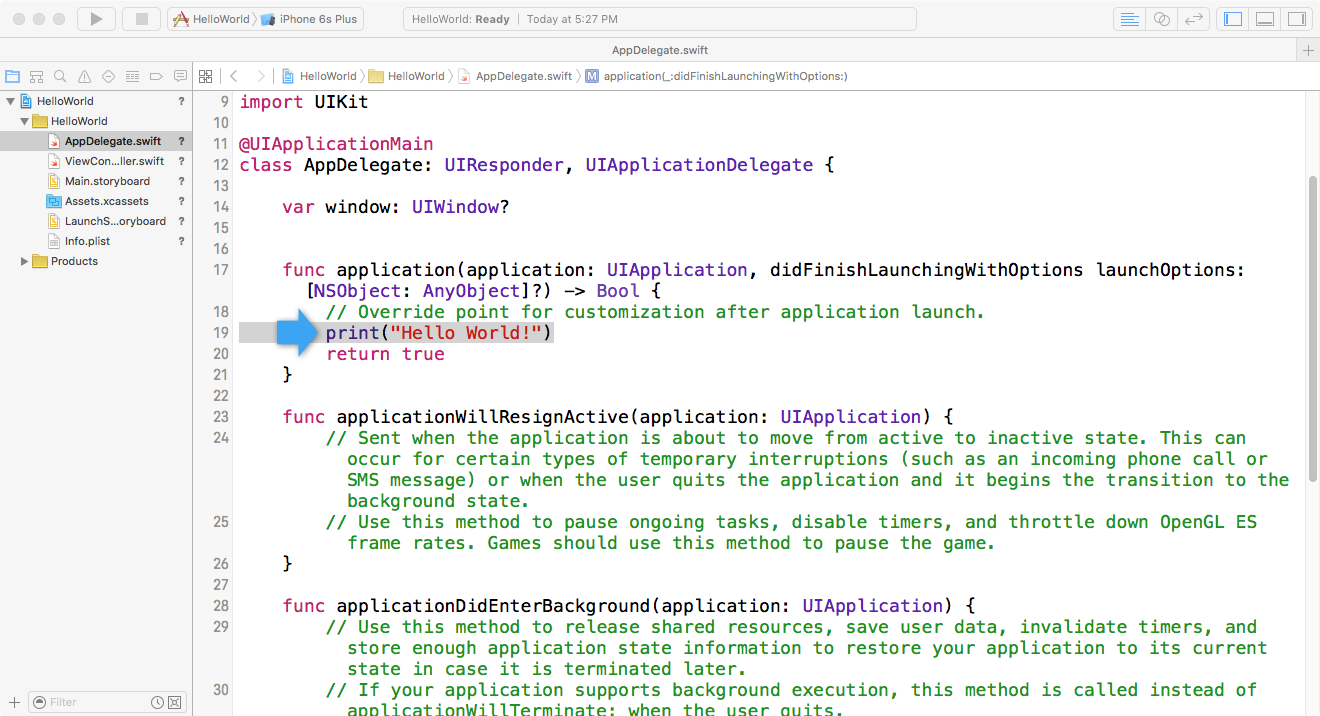
Now press run and you should see a blank app boot up, and the words “Hello World” print to the console.
Note that this will not show up in the iPhone simulator. Look at the bottom of your Xcode window and you’ll see a console that says ‘Hello World!’.
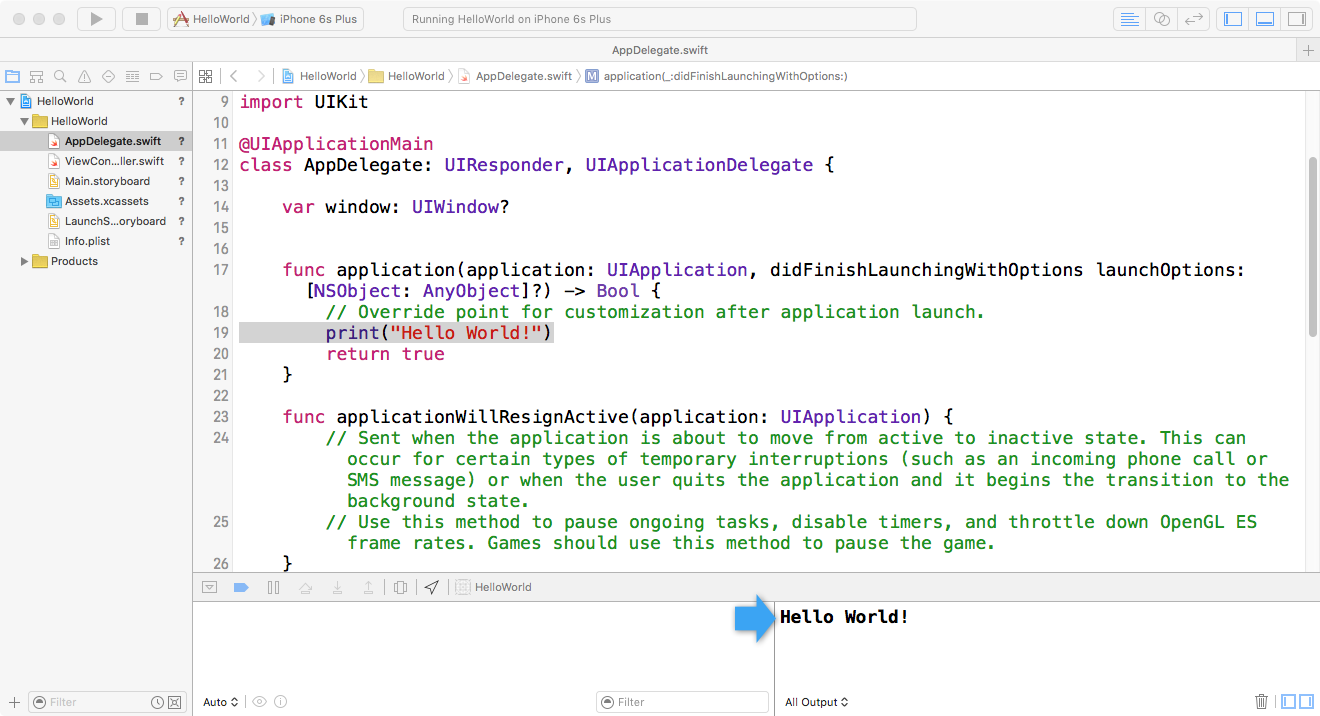
Congratulations! You just wrote your first app in Swift! This app probably won’t win any awards, let’s trying doing something a little deeper…
Adding a Table View
In this section, we’re going to actually put some stuff on the screen.
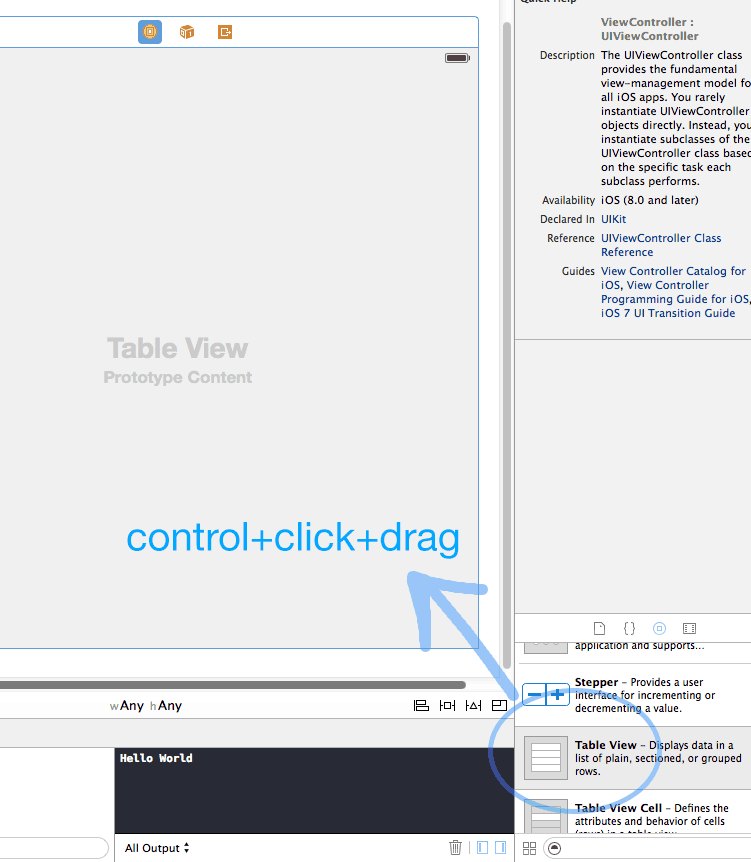
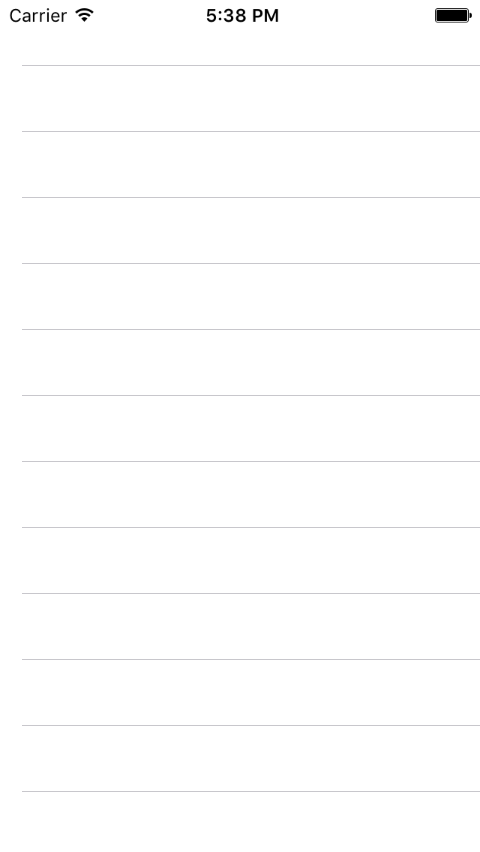
Open up your Main.storyboard file in Xcode and lets drag in a “Table View” object from the Object Library (don’t use a table view controller.) Position this fullscreen in your app window and make sure it lines up with the edges. Then resize the height by dragging down the top edge and giving a little bit of space (this gives room for the status bar at the top of the phone.) If you run the app at this point, you should see an empty table view in the simulator.
The empty table view in the iPhone Simulator:
Now we need to set up a delegate and data source for the table view. The Data Source is an object that informs the Table View of which data to show. The delegate let’s us handle interactions such as tapping a row on the Table View.
Setting these outlets is easy to do in interface builder. Just hold control, and then click and drag from the tableview to the “View Controller” object in your storyboard’s hierarchy, and select ‘data source’. Repeat with the ‘delegate’ options.
Setting up the UITableView Data Source and Delegates
I’ve received a ton of questions about this, and many people reporting errors about the table view not being set, so to make things a little easier I made a quick video showing how connecting Storyboard objects to your code works. Make sure to go fullscreen and select the 720p option to make sure you can see what’s happening. This will look slightly different from the Xcode interface you are using, but functionally all this works the same.
Connecting Storyboard Objects to Code in Xcode
Okay, now let’s dig in to the protocol methods for Table Views. Because we’re using the UITableViewDataSource and UITableViewDelegate in our view controller, we need to modify the class definition to say as much.
So open ViewController.swift and modify this line:
class ViewController: UIViewController { |
to this:
class ViewController: UIViewController, UITableViewDataSource, UITableViewDelegate { |
This will cause some errors to pop up, but don’t worry this is expected. In fact, the errors are the primary purpose of indicating these protocols on our class. It lets us know that we aren’t done actually implementing the UITableViewDataSource or the UITableViewDelegate yet.
Command+clicking on either of these protocols will show the required functions at the very top. In the case of a tableview dataSource, we need at least these two:
public func tableView(_ tableView: UITableView, numberOfRowsInSection section: Int) -> Intpublic func tableView(_ tableView: UITableView, cellForRowAt indexPath: IndexPath) -> UITableViewCell |
So let’s modify our View Controller class by adding these two functions.
func tableView(_ tableView: UITableView, numberOfRowsInSection section: Int) -> Int { return 10}func tableView(_ tableView: UITableView, cellForRowAt indexPath: IndexPath) -> UITableViewCell { let cell = UITableViewCell(style: .subtitle, reuseIdentifier: "MyTestCell") cell.textLabel?.text = "Row \(indexPath.row)" cell.detailTextLabel?.text = "Subtitle \(indexPath.row)" return cell} |
As a handy trick, when you need to write these long methods for cases like this, you can just start typing the function in Xcode, focusing on the unique part of the name such as “cellForRo…” and Xcode will usually auto-complete what you were typing.
The first method is asking for the number of rows in our section, in this simple tutorial we just hard-code 10, but normally it would be the length of an array controller. This example is intentionally simple.
The second method is where the magic happens. Here we create a new instance of a UITableViewCell called cell, using the Subtitle cell style.
Then, we assign the text value of this cell to the string “Row #(indexPath.row)”
In Swift, this is how variables are embedded within a string. What we’re doing is retrieving the value of indexPath.row by inserting (indexPath.row) in to our string, and dynamically replacing it with the row number of the cell. This allows results such as “Row #1″, “Row #2″, etc.
The detail text label is only available in the Subtitle cell class, which we are using here. We set it similarly to “Subtitle #1″, “Subtitle #2″, and so on.
Go ahead and run your app and you’ll now see an amazing list of cells with titles and subtitles indicating their row numbers. Don’t see the cells? Make sure you connected your storyboard delegate and data source to the ViewController class. See the Youtube video here
This is one of the most common ways to display data in iOS, and will be sure to serve you well. For the full code to my View Controller file, take a look at the full source for this section on github.
You’re doing great!
Made it this far and everything is working? Awesome! If not, let me know if you got stuck. I’m happy to help 🙂
In my Swift book we spend some more time going over the basics, as well as delving much deeper in to the advanced details. Learn more about it here.
In part 2, we’re going to explore using the iTunes search API to create an app capable of finding and displaying albums within the iTunes store.
Full code for this part here »


Will you be providing screenshots? I’m fairly new to iOS / Objective C and Swift so I don’t know where I will start yet.
I was going to, and in fact I even took some for this tutorial. But then I am not sure how the Apple NDA works, I’m concerned that screenshots will be considered confidential information by Apple. When I’m certain there’s no legal issues with posting screenshots, then I will do so.
Apple’s book on Swift is public. So I am sure as long as you follow the guidelines of the book and put or illustrate it in your own words, styles, examples, but covering the same material, I doubt that would break the NDA.
Plus Apple wants people to switch. Filing a lawsuit would be counter productive.
Way to go! I am at the show and only a year into developing apps so how to bridge all this is still fuzzy. Huge thanks for jumping on this so fast.
No problem!
func tableView(tableView: UITableView!, numberOfRowsInSection section: Int) -> Int {
…
func tableView(tableView: UITableView!, cellForRowAtIndexPath indexPath: NSIndexPath!) -> UITableViewCell!
I don’t get why we have two different functions having the same name… am I wrong?
They don’t have the same name. One of them gets the cellForRowAtIndexPath, the other gets the numberOfRowsInSection.
They do have the same name, but they do have a different method signature (parameters).
This is generally called method overloading, where you have the same function name, but it receives different arguments. This scenario also has a different return type 🙂
Incorrect, these methods do not have the same name hence it is not method overloading.
I do not get the expected result…meaning” i don’t get an amazing list of cells with titles and subtitles indicating their row numbers. ”
I have even tried copy pasting your code and still just get a blank page when i compile the project. Where am i going wrong?
Sounds like your storyboard has something configured wrong. Try tweaking your storyboard a bit, maybe remove autolayout constraints. I’ve been having issues with that.
I got the same blank page. Are you sure you are using the xcode6-beta? There are some discrepancies when I try to follow your tutorial. e.g., main.storyboard seems included a table view controller by default with a table view object in it. If I remove the controller, there is no scenes to put the table view object. Your IDE UI seems a little different.
It looks different because Apple prohibits sharing screenshots or videos of Xcode 6. I’m using the beta, but showing it in Xcode 5 in the images.
If there are no Scenes to add the table view to, drag in a new View Controller object and set its class to whatever class you’re referring to, I think it’s probably ViewController in your case.
That’s why it looks different on your video. Got it. Thanks.
BTW, great work. Really appreciate your effort to put up the tutorial.
Thanks!
Hello, I’m new to making apple apps. Is it possible to build apps using an iPad as I do not own a MacBook
Unfortunately you need a full Mac computer.
Thank you.
I tried this on the simulator and on my iPod Touch running iOS8 beta and I get a blank white screen on both. What am I doing wrong here?
At this stage of the tutorial you will only see a blank screen. The “Hello World” text shows in the console.
Just some tips that helped me:
– When creating the project, do not tick Use Core Data
– When inserting the Table View- do not insert the Table View Controller object, Table View is down the list and will ‘snap’ in to the View Controller that was created when the project was created.
Good to point out these details, thanks David!
Thanks David! Was wondering why Table View wasn’t working for me 😉
when connecting the table view to the code, I noticed that in your assistant editor, a rather empty class comes up, making it seem simple to connect the code. When I run the editor this comes up
/Users/joeouimette/Desktop/Screen Shot 2014-06-21 at 3.48.31 PM.png
Why? How can I have the simple, empty table view class that is displayed in your video?
well the picture didn’t display, but the class that comes up in my AE has over 500 lines of code displayed. I am running Xcode 6.
It’s possible the assistant editor has opened the wrong file. On the top navigation in the right-side of the assistant editor, select ‘Automatic’ -> ‘ViewController.swift’
there is the problem… it displays Automatic -> UIViewController.h
Do you know why the .Swift file is not even possible to display?
Thanks a lot. You are doing a great job!
If anyone else is having issues with this in Xcode Beta 3 try replacing “cell.text = “Row #\(indexPath.row)” with “cell.textLabel.text = “Row #\(indexPath.row)”
perfect this worked!!! thanks!
Do you know how to fix cell.image not working in xcode beta 3? I figured out the textLabel fix but I’m stuck on how to get cell.image to work! Thanks!
Just found it on the next page of the tutorial in the comments! Thanks!
You may want to update your tutorial for beta 3 🙁 ‘text’ is unavailable: API’s deprecated as of iOS 7 and earlier are unavailable in Swift
get this error on cell.text
Thanks for a really nice and to the point “Hello World” app!
The only hiccup I had was after I added the UITableViewDataSource, UITableViewDelegate – Xcode displayed a syntax error. After reading further into your tutorial and command-clicking to see the protocols, I saw that the error is the natural thing to happen since the two required functions were not yet in the code.
Also helpful is Marrick Lip’s tip for cell.text.
Sorry about that. I had to update the tutorial to accommodate the changes in Xcode 6. It’s not compatible with Xcode 6 Beta 4. I also added some screenshots to clear things up.
Thanks for the tutorial jameson. It was very simple and easy to understand.
Thanks for the tutorial, Jameson. Your efforts to create this is much appreciated!
Thank you, Mark!
Hello, this is a great tutorial but I’m having a little issue, its probably just me being simple as I’m only just starting out with this but i keep getting this error –
Type ‘ViewController’ does not conform to protocol ‘UITableViewDataSource’
I get this error at the end of this line of code – class ViewController: UIViewController, UITableViewDataSource, UITableViewDelegate {
There are required functions in UITableViewDataSource you *have to* implement! Make sure to keep pushing through the tutorial and include *all* mentioned functions. Especially the ones starting with the word “tableView”!
Good job. Not easy for a newbie but it’s working ! A question : you have “.h” and “.m” files in swift ?
Nope, .h and .m files are no longer needed. Everything goes inside of a single .swift file.
I recently started programming with x code, I love that it’s similar to j Python, it’s color coded!!! It’s so supper user friendly, but I am a buggier and I have been reading on the terminology, because again I am a beginner with x code ,but for the moste part it is familiar to some of the code I use to code with.I have a question after you get a tamp let and then you have your app designed with the UIimage, how do you add the code I know how to click and drag, but I don’t know how to write the code because there are well similar to how in English there are grammatical errors ,so if you add a comma it’s wrong etc. how or can you explain how to write the code correctly. Pleas thank you!
Good tutorial!
Great tutorial..i’ve started learning swift with this tutorial only !!
I figured it’s time to get on board with Swift or get out. This is a great start and thank you so much for the energy and effort so far. I’m still a little queazy about Swift syntax, but I suppose I’ll eventually get used to it. I kind of want my semicolon back 🙂
Hy,
I liked this example, so i made a Github for every step and more in swift 2 : https://github.com/weareopensource/Sample-iOS_Swift_2_GetStarted
Thank you for this tutorial
Hi
Your post about apps developing is very helpful for us.
I really appreciate your work.
Thanks,