This section completely updated to reflect changes in Xcode 6.3, as of April 16, 2015
In parts 1, 2, and 3 we went over some basics of Swift, and set up a simple example project that creates a Table View and a puts some API results from iTunes inside of them. If you haven’t read that yet, check out Part 1, Part 2, and Part 3. If you enjoy these tutorials, I’m also working on a book full of quality content for Swift developers, and it’s available for Pre-Order now.
Loading cells from a storyboard prototype
Okay, so first there is one more thing we need to clean up. The Table View Cell thats being created in the delegate function cellForRowAtIndexPath is not the most efficient way to create cells. In iOS we always want to use dequeueReusableCellWithIdentifier in order to get a cell out of memory if one is available, rather than creating a new one every time a cell is rendered. This helps make scrolling fast, and keeps the memory usage down.
First, we are going to be referring to this cell by a storyboard prototype, which in code is represented by a string.
So, near the top of the SearchResultsViewController class, add the following line:
let kCellIdentifier: String = "SearchResultCell"
Next, we need to do some more storyboard modifications.
In order for Swift to know what a SearchResultCell is, we need to specify the cell as a prototype cell in our storyboard, and set it’s reuse identifier to SearchResultCell. So open up your storyboard and select the tableview, change the number of ‘prototype cells’ to 1.
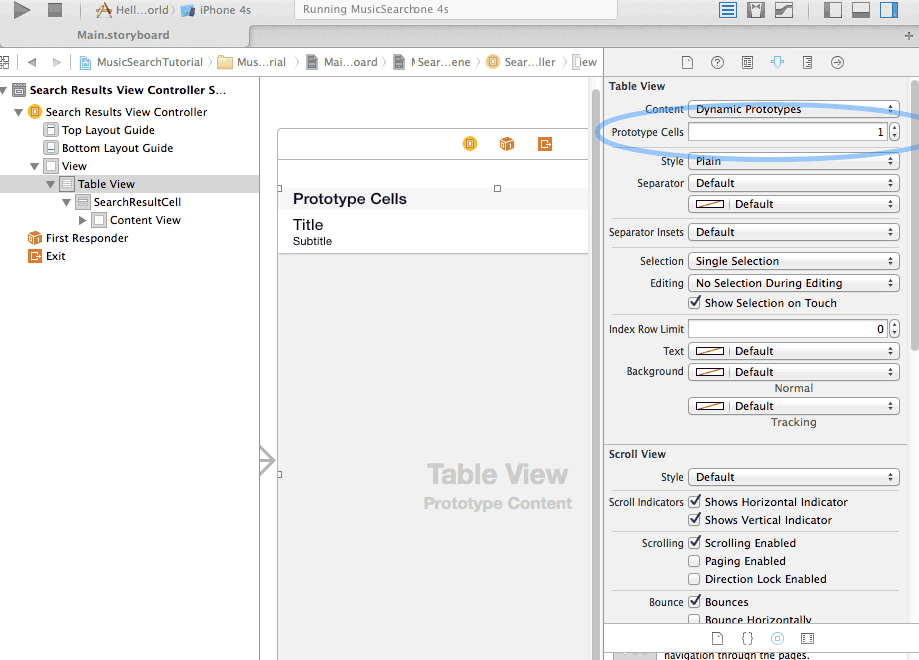
Next, we need to click the newly added prototype cell to select it in the attributes editor panel.
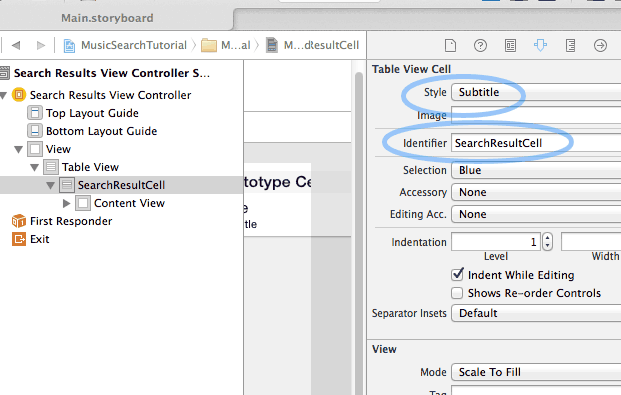
After you’ve selected it, in the attributes inspector change the Style to “Subtitle” and type in the identifier as “SearchResultCell”.
Finally, in our SearchResultsViewcontroller.swift file, we are going to replace the instantiation of the cell with the following:
let cell: UITableViewCell = tableView.dequeueReusableCellWithIdentifier(kCellIdentifier) as! UITableViewCell
What this is going to do is give us an already instantiated cell.
Run the app, and once again we have the exact same result, except now we’re loading the cell from a storyboard prototype, which allows us to do all sorts of cool stuff with it.
Making the cells do something!
Okay, now we have one more delegate function that UITableView is going to call on our delegate class, SearchResultsViewController. This one will look like this:
func tableView(tableView: UITableView, didSelectRowAtIndexPath indexPath: NSIndexPath)
Whenever a cell is tapped, this function will run. So let’s grab out the iTunes data for the row that was clicked by accessing the index of the array set by indexPath.row, the integer id of the row clicked. And then let’s display the same info in a popup.
Add your didSelectRowAtIndexPath method like so:
func tableView(tableView: UITableView, didSelectRowAtIndexPath indexPath: NSIndexPath) {
    // Get the row data for the selected row
    if let rowData = self.tableData[indexPath.row] as? NSDictionary,
        // Get the name of the track for this row
        name = rowData["trackName"] as? String,
        // Get the price of the track on this row
        formattedPrice = rowData["formattedPrice"] as? String {
            let alert = UIAlertController(title: name, message: formattedPrice, preferredStyle: .Alert)
            alert.addAction(UIAlertAction(title: "Ok", style: .Default, handler: nil))
            self.presentViewController(alert, animated: true, completion: nil)
    }
}
Here, we’re setting rowData to the value of whatever the array object at the selected index is to first get the information in to rowData. Then, we set the name and formattedPrice variables based on the rowData dictionary. Next, we instantiate an UIAlertController object, and set it’s title, message, and add an “Ok” button to dismiss the alert. Finally we show the alert with self.presentViewController()
Give it a run and you should now be able to see the name and price of any app clicked show up in a popup window. Cool right?
The full code for Part 4 is available here.
Part 5 focuses on speeding up our Table View. To get updates on this tutorial in your email, subscribe here.
Hi Jameson,
first of all: great job! i actually now understand how to program iOS. It’s just because of this language & your tutorial.
I tried to implement your snippets into my app, but for some reason, it shows nothing. HTTP JSON is OK, but i guess it hangs because i don’t have some identifier for my JSON. On iTunes,
it is:
{{“resultCount”:50, “results”: [ {Stuff1}, {Stuff2}]}
But on mine, it is
[{Stuff1},{Stuff2}]
It stops on
var jsonResult: NSDictionary = NSJSONSerialization.JSONObjectWithData(data, options: NSJSONReadingOptions.MutableContainers, error: nil) as NSDictionary
Do you have any idea, how i can fix that? I’d really would like to thank you!
I’m not sure that’s actually JSON in your case. If it does accept it for deserialization, it would be of type NSArray, and there would be no keys to read, just strings.
for IB newbies like me who are bound to be very literal
‘In the attributes inspector change the type to “Subtitle”’
replace ‘type’ with ‘Style’
Hey James,
Since we’re using storyboards and prototype cells, isn’t it the case that the cell will never be nil?
https://stackoverflow.com/questions/10254951/uitableview-cells-not-nil-at-initialization (reference the answer referencing storyboards).
Yep, I actually removed it in the later parts, but didn’t remove it from here.
Hi,
when use tableView.dequeueReusableCellWithIdentifier(kCellIdentifier) as? UITableViewCell method, should follow the link site
http://stackoverflow.com/questions/24022763/uitableview-in-swift,
otherwise,app crash
Why don’t you use type inference?
Because I’m used to objective-c. No reason I can’t use it more, just a habit. This series will evolve to be more and more Swifty over time 🙂
I’m getting fatal error: Can’t unwrap Optional.None on this line:
cell.detailTextLabel.text = formattedPrice
Remove that line, then add:
println(cell.detailTextLabel)
See if you get the same error. If not, then add
println(formattedPrice)
One of these two variable is effectively nil for one reason or another. First we need to know which one it is.
David – I had the same problem as you and couldn’t figure out what I was doing wrong. Eventually, in my Main.storyboard, I set the Table View Cell style from Custom to Subtitle. That made it work for me. Strange. Hope this helps.
Interesting, mine works fine set to Custom. I think this might just be the quirkiness of the beta. I would expect some of these issues to resolve themselves with the full release.
Hi Jameson,
have started to try SWIFT with your series. Thank you! A minute ago I have preordered your book.
Could you please say something about the use of standard methods in Swift Could be it is very easy, but I do not see it.
Example: I want to use the function from UITextKit to get the selected text in a text view as a string. I have the UITextRange value, but I cannot manage to declare/use the “func textInRange” in the correct way.
In the Apple documents I see these lines:
Return the text in the specified range. (required)
Declaration
SWIFT
func textInRange(_ range: UITextRange!) -> String!
OBJECTIVE-C
– (NSString *)textInRangeUITextRange *)range
Under “class ViewController” I have simply entered this line:
func textInRange(_ range: UITextRange!) -> String!
But I am getting the warning: “Extraneous ‘_’ in parameter: ‘range’ has no keyword argument name
var textRange = myTextField.selectedTextRange
println(textRange)
The UITextKitTextRange output is correct, the selected text starts at 4 and is 9 characters long = (4, 9)B
I am searching for example for 3 days now, but nothing about Swift, all about Objective-C.
best regards
Peter
Hi Peter, the underscore means the parameter name is not required, as does the error message you’re seeing.
Just use this:
textInRange(textRange)
Thank you Jameson,
good to know what the underscore means.
Meanwhile I have created the same code lines in objective-C and posted the question in macrumour forum. User “Dranix” has then given the Swift equivalent. It was very similar, but I had not found it.
🙂
Peter
Swift -Code:
mySelectedText2 = myTextField.textInRange(myTextField.selectedTextRange)
Objective-C-Code:
mySelectedText2 = [myTextField textInRange:(myTextField.selectedTextRange)];
Hi Jameson
The sample in this part 4 runs nice !!!
But, every time I clicked the OK button in the message alert when the app display the row selected, in the console I received a warning with this message:
2014-07-28 18:32:11.302 FirstApp[3201:141889] Warning: Attempt to dismiss from view controller while a presentation or dismiss is in progress!
Is this normal?
Regards
Israel
Same warning here 😐
It seems to be a ßug: https://twitter.com/steipete/status/489847881248288770
This usually means you’re dismissing something twice, but I would assume it is in fact a bug in the beta.
Ok … thanks z4r & Jameson … will wait for the final release.
Hi, first of all, congratulations on the tutorials…they’ve been very helpful…. 🙂
I just completed the 4th tutorial and Im having a small bug which I can’t figure out….
Everytime I tap (click) the row in the tableview, it opens the second last item selected, it doesn’t show the item Im actually tapping on, but instead, the other I clicked before…the first I time I tap, nothing happens…
That’s strange, can you post it on github so I can take a look?
Hi Matheus,
I had the same problem as you. I’m guessing you used the function autocomplete and selected the wrong function (as I did). Make sure you have implemented didSelectRowAtIndexPath and not didDeselectRowAtIndexPath.
Thank you!
Great call – I did the exact same thing!
Same thing was happening to me. I accidentally imported the didDeselectRowAtIndexPath instead of the didSelectRowAtIndexPath!
The frustrating part for me is that most of the code of the code goes unexplained. How would I know what key value pair would return the price from the itunes appstore? Sure I can go google the API, but it would make sense to include that in this tutorial. Just my .02, but I feel a lot is missing.
Log the JSON to the console and look for yourself.
As a beginner something that simple may require more detail or understanding. I feel part 1 started with a lot of detail, and then it was just a do this or do that. Again I am just trying to help.
None mentioned anything about UIAlertView being deprecated?
It is deprecated, but this wasn’t updated to reflect that. I’ll work on that now.