This post compatible with Xcode 6.3 Beta, Updated on February 16, 2015
Don’t have 6.3 yet? Make sure to download it here using your iOS Developer account.
Core Data is the de facto standard way to persist and manage data in both iPhone and Mac applications, and with Swift it’s a bit easier. So it’s only natural that we should take some time to learn about it when building apps. Eager to see what we’ll have created by the end of this tutorial? Take a look at the video, we’ll be creating this table view, populating it with data, adding the ability to delete records, add records, and sort/search records all backed by Core Data. This data is persistent and lasts even through a complete shut down of your phone.
The first thing to know about Core Data before diving in is that it is not a relational database, and although it uses SQLite as a backing engine, is not an ORM to a relational database either. The SQLite backend is more of an implementation detail, and in fact binary files or plists can be used instead.
The official Apple documentation describes Core Data like this:
“The Core Data framework provides generalized and automated solutions to common tasks associated with object life-cycle and object graph management, including persistence.”
[developer.apple.com]
Before we get too technical about what Core Data is, I think it’s useful to dive in and start playing with the API a bit.
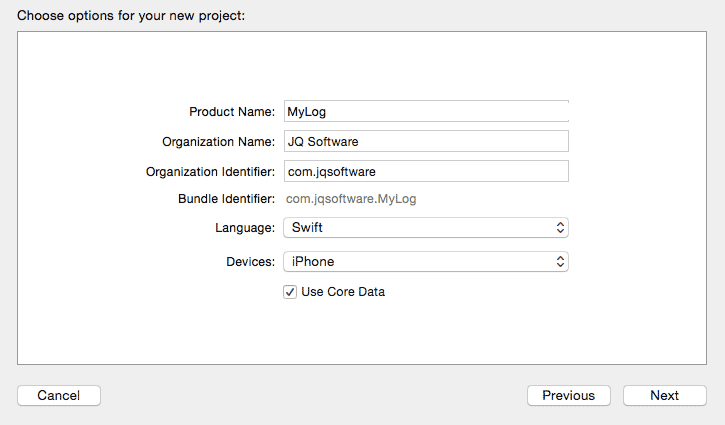
Create a new Xcode 6 project using a single-view template, Swift as the language, and with Core Data enabled. I’ll call the project MyLog.
Looking for something more in-depth than a tutorial? Try my book & video courses

Learn About My Book & Video Packages »

Looking at the AppDelegate.swift file you’ll notice using this option has added quite a few functions. Most of these are setting up the Core Data stack. The defaults are fine for now. The primary object that needs to be used to work with Core Data is the managedObjectContext defined here.
If you used the Core Data template as shown above, this code will already be present.
lazy var managedObjectContext: NSManagedObjectContext? = {
    // Returns the managed object context for the application (which is already bound to the persistent store
    // coordinator for the application.) This property is optional since there are legitimate error
    // conditions that could cause the creation of the context to fail.
    let coordinator = self.persistentStoreCoordinator
    if coordinator == nil {
        return nil
    }
    var managedObjectContext = NSManagedObjectContext()
    managedObjectContext.persistentStoreCoordinator = coordinator
    return managedObjectContext
}()
All you really need to know about this, is that managedObjectContext is a lazy variable on AppDelegate that is at our disposable for use in performing Core Data calls. Knowing this we can access the managedObjectContext from our ViewController.swift file. For example in viewDidLoad() of ViewController.swift, we can use this code to print the managedObjectContext’s description to the console. (New lines are highlighted)
override func viewDidLoad() {
    super.viewDidLoad()
    // Do any additional setup after loading the view, typically from a nib.

    // Retreive the managedObjectContext from AppDelegate
    let managedObjectContext = (UIApplication.sharedApplication().delegate as! AppDelegate).managedObjectContext

    // Print it to the console
    println(managedObjectContext)
}
We’ll be accessing the managedObjectContext pretty frequently, so we should pull this out of the viewDidLoad() method and move it somewhere we can access it easily. How about if we just store it as an instance variable on the ViewController?
import UIKit

class ViewController: UIViewController {

    // Retreive the managedObjectContext from AppDelegate
    let managedObjectContext = (UIApplication.sharedApplication().delegate as! AppDelegate).managedObjectContext

    override func viewDidLoad() {
        super.viewDidLoad()
        // Do any additional setup after loading the view, typically from a nib.

        // Print it to the console
        println(managedObjectContext)
    }

    override func didReceiveMemoryWarning() {
        super.didReceiveMemoryWarning()
        // Dispose of any resources that can be recreated.
    }

}
The managedObjectContext variable is computed using the existing managedObjectContext in the application’s delegate. In viewdidLoad() we cause this variable to be computed by printing it to the console. If your application is set up right you should see something like this:
Optional(<NSManagedObjectContext: 0x7fe68b58c800>)
You’ll notice the Xcode template produced an additional file, MyLog.xcdatamodeld.
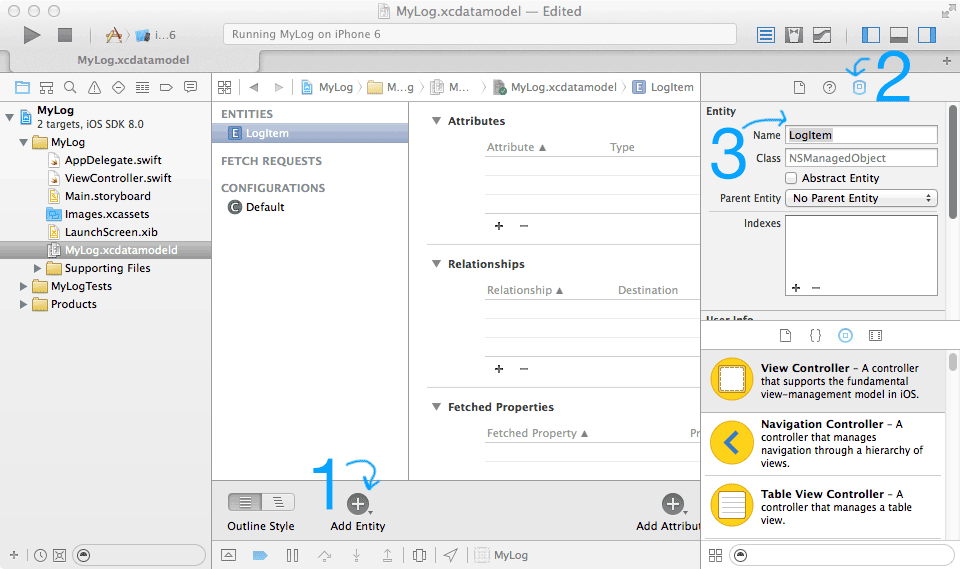
Opening up this file you can see the Core Data model editor.
Let’s add a new Core Data entity called LogItem. Our log app will show a list of LogItems, which have a bit of text in them.
Click the “Add Entity” button and then in the right-hand panel select the “Data Model Inspector”. From here we can rename the default name, Entity, to LogItem.
Next, at the bottom we can add our first attribute by pressing the “+ Atrribute” button at the bottom.
Name this attribute title, and give it a type of String. We’ll also add a second attribute of type String called itemText.
IMPORTANT!
From this point on, any changes you make to your Core Data model, such as adding a new Entity or Attribute will lead to an inconsistency in the model of the app in the iPhone Simulator. If this happens to you, you’ll get a really scary looking crash in your app as soon as it starts. You’ll also see something like this show up at the very bottom of your console, “reason=The model used to open the store is incompatible with the one used to create the store”.
If this happens to you there is a very easy fix:
In the iPhone Simulator, or on your device, just delete the app, and then perform a new Build & Run command in Xcode. This will erase all out of date versions of the model, and allow you to do a fresh run.
Now that we have our first Entity created, we want to also be able to directly access this entity as a class in our code. Xcode provides an automated tool to do this. In the menubar select Editor->Create NSManagedObject Subclass…
In the first prompt, check the MyLog model and press next. Then, check the LogItem entity, and press next again.
A file save window should appear with an option to specify the language as Swift, select this. Finally hit Create, and you should now see a LogItem.swift file added. It’s contents should be something very close to this:
import Foundation
import CoreData

class LogItem: NSManagedObject {
    @NSManaged var title: String
    @NSManaged var itemText: String
}
This class is generated from the xcdatamodeld file. The entity we created is represented by the similarly named class LogItem, and the attributes are turned in to variables using the @NSManaged identifier, which gives the variables special treatment allowing them to operate with Core Data. For most intents and purposes though, you can just think of these as instance variables.
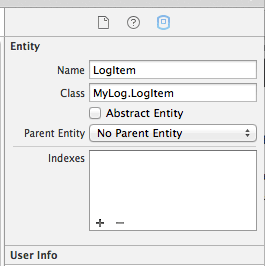
Because of the way Swift modules work, we need to make one modification to the core data model. In the field “Class” under the data model inspector for our entity, LogItem, we need to specify the project name as a prefix to the class name. So instead of just specifying “LogItem” as the class, it needs to say “MyLog.LogItem”, assuming your app is called “MyLog”.

In our ViewController.swift file in the viewDidLoad method, let’s instantiate some instances of LogItem. There are many ways to do this, but the least verbose is to use the insertNewObjectForEntityForName method of NSEntityDescription.
override func viewDidLoad() {
    super.viewDidLoad()

    let newItem = NSEntityDescription.insertNewObjectForEntityForName("LogItem", inManagedObjectContext: self.managedObjectContext!) as! LogItem
}
Here we insert a new object in to the core data stack through the managedObjectContext that the template function added to AppDelegate for us. This method returns an NSManagedObject which is a generic type of Core Data object that responds to methods like valueForKey. If you don’t quite understand what that means, don’t worry too much about it, it’s not going to prevent you from being able to use Core Data. Let’s keep moving.
With an NSManagedObject version of newItem, we could say newItem.valueForKey(“title”) to get the title. But this is not the best approach because it leaves too much opportunity to mis-type an attribute name, or get the wrong object type unexpectedly and have hard crashes trying to access these attributes.
So, in our case, we instead cast the NSManagedObject that insertNewObjectForEntityForName returns, to our generated class LogItem.
What this means, simply put, is that we can set the title and itemText like this:
override func viewDidLoad() {
    super.viewDidLoad()
    // Do any additional setup after loading the view, typically from a nib.

    let newItem = NSEntityDescription.insertNewObjectForEntityForName("LogItem", inManagedObjectContext: self.managedObjectContext!) as! LogItem

    newItem.title = "Wrote Core Data Tutorial"
    newItem.itemText = "Wrote and post a tutorial on the basics of Core Data to blog."
}
If we had not generated our LogItem.swift file earlier, the type LogItem would not be defined and we would be limited to working only with NSManagedObject types. This is a really nasty way to work with the Core Data API as it relies heavily on determining object classes, entities, state, and more at runtime based on string comparisons, yuck!
Now that we’ve created a new item, and set both it’s title and text, we can query it elsewhere in our app and get the object back. Let’s override the viewDidAppear() method and implement a way to look at our items info. We’ll perform a Core Data fetch (which is like a query if you have worked with SQL before), then we will present the contents of the row we retrieved in a new alert window.
override func viewDidAppear(animated: Bool) {
    super.viewDidAppear(animated)

    // Create a new fetch request using the LogItem entity
    let fetchRequest = NSFetchRequest(entityName: "LogItem")

    // Execute the fetch request, and cast the results to an array of LogItem objects
    if let fetchResults = managedObjectContext!.executeFetchRequest(fetchRequest, error: nil) as? [LogItem] {

        // Create an Alert, and set it's message to whatever the itemText is
        let alert = UIAlertController(title: fetchResults[0].title,
            message: fetchResults[0].itemText,
            preferredStyle: .Alert)

        // Display the alert
        self.presentViewController(alert,
            animated: true,
            completion: nil)
    }
}
First, we create a new NSFetchRequest instance using the entity LogItem.
Next, we create a fetchResults variable by using the executeFetchRequest method of managedObjectContext. The only thing we have specified in our fetchRequest is the entity, so this particular fetch just returns every record. If you are familiar with SQL, a fetch request with no predicate on the LogItem entity is something like “SELECT * FROM LogItem”.
Next we create a UIAlertController instance to present a message to the screen, and set it’s title and message properties to the title and itemText properties of the first LogItem in our fetch results (which is an array of LogItem objects).
Run the app and you should see the item presented to the screen. You’ve now stored and retrieved data from Core Data. This is the first step in to building apps with persistent storage.
In part 2, we’ll talk about working with multiple records and using NSPredicate to perform filtered requests.
The full source code to this part is available here on Github.
If you found this post useful, check out my other tutorials, and take a look at my Swift eBook, which is now available for early access.


please help to resolve the issue of “use of undeclared identifier managedObjectContext”
thanks
That depends on a variety of factors, like where the error is coming from. But most likely you did not check off the box “Use Core Data”.
thank you for your great help. would you please provide the source code for this chapter?
https://github.com/jquave/Core-Data-In-Swift-Tutorial/tree/Part1
I also had this problem at the beginning of the tuto and it was because I didn’t import CoreData in my ViewController file
Great tutorial, thank you!!!
Even though I checked the box to use CoreData I still had to write “import CoreData” in my ViewController.swift. (I created another project to double check that I didn’t delete it on accident, and yup, same thing, it’s missing from the viewcontroller.) I’m on xCode 6.3.1.
So, if you’re seeing an error like “Use of unresolved identifier ‘NSFetchRequest'”, try adding “import CoreData at the top of your ViewController.swift file.
🙂
…On to part 2!
2014-10-09 11:05:18.270 MyLog[57499:11664383] Unresolved error Optional(Error Domain=YOUR_ERROR_DOMAIN Code=9999 “Failed to initialize the application’s saved data” UserInfo=0x7b6e5310 {NSLocalizedDescription=Failed to initialize the application’s saved data, NSUnderlyingError=0x7c068450 “The operation couldn’t be completed. (Cocoa error 134100.)”, NSLocalizedFailureReason=There was an error creating or loading the application’s saved data.}), Optional([NSLocalizedDescription: Failed to initialize the application’s saved data, NSUnderlyingError: Error Domain=NSCocoaErrorDomain Code=134100 “The operation couldn’t be completed. (Cocoa error 134100.)” UserInfo=0x7c068430 {metadata={
NSPersistenceFrameworkVersion = 519;
NSStoreModelVersionHashes = {
};
NSStoreModelVersionHashesVersion = 3;
NSStoreModelVersionIdentifiers = (
“”
);
NSStoreType = SQLite;
NSStoreUUID = “36EC14C8-51E6-4F07-8A93-260A2504E49D”;
“_NSAutoVacuumLevel” = 2;
}, reason=The model used to open the store is incompatible with the one used to create the store}, NSLocalizedFailureReason: There was an error creating or loading the application’s saved data.])
This is due to the migration failing (a change was made to the model and then the app was run again)
The simple solution is to delete the app from the simulator, and reinstall it.
The more complex solution is to be careful to create versioned models, which I’ll talk a little bit about in the rest of the tutorial
presentFirstItem() Where is this method being called from?
The full source code is available here: https://github.com/jquave/Core-Data-In-Swift-Tutorial/tree/Part1
It’s just that there is a little misprint in the tuto: the method is named “presentItemInfo” but it’s “presentFirstItem” which is called in the ViewDidLoad.
Hi Jameson,
thanks a lot for this really helpful tutorial. Please hurry up the write the second part, i can’t wait 🙂
I improved the code a bit to show that there will be a new item for every start of the application:
“`
let alert = UIAlertView()
alert.title = “\(fetchResults.count) Items found”
alert.message = “\(fetchResults[0].title) \n \(fetchResults[0].itemText)”
alert.show()
“`
Thanks again. Longing for your book.
peter
Thanks Peter! Part 2 is out now 🙂
When will part 2 be posted? 🙂
It’s posted now 🙂
getting error below when I run example. AppDelegate.swift. Any suggestions?
lazy var managedObjectContext : NSManagedObjectContext? = {
let appDelegate = UIApplication.sharedApplication().delegate as AppDelegate
if let managedObjectContext = appDelegate.managedObjectContext { // Thread 1: EXC_BAD_ACCESS(code=2, address=…..)
return managedObjectContext
}
else {
return nil
}
}()
ignore my previous post about the BAD_EXC_ACCESS.
My mistake. typo errors.
I think I followed the tutorial steps precisely but keep getting this error: “The model used to open the store is incompatible with the one used to create the store.” Any suggestions why are welcome.
This is explained in a later tutorial, but you can resolve the issue by deleting the app from the simulator and re-building. It happens when you run the app with one model, then run it again with changes to that model.
First up – great stuff Jameson. These tutorials are really helpful – thank you.
Second – if anyone else is getting an error saying something like ‘Warning: Attempt to present on whose view is not in the window hierarchy!’ it appears there is an issue pushing a new View onto a View which hasn’t been shown to the User. Not sure if this is new to 8.1.2 or what exactly the deal is.
Regardless, I was able to get this to work by creating an override function on the ‘viewDidAppear()’ method and then put the ‘presentItemInfo()’ function inside of it. With that little change I was able to get the app running w/out any problems.
Hope this helps, thanks again Jameson …
Thanks James! I was probably being careless with the way I was doing the presentation, I’ll update this on the next round of changes.
I also got the window hierarchy error, but though James’s fix kept the error from popping up, I still don’t see anything on the screen. It was just the presentItemInfo() function that goes in the viewDidAppear(), right?
Bit late but this is the first time I’ve ever been able to perhaps help someone! As a beginner it confused me but found that you only need to put the presentItemInfo() call to the function inside the override.
I have a question with this paragraph you worte:
“Because of the way Swift modules work, we need to make one modification to the core data model. In the field “Class” under the data model inspector for our entity, LogItem, we need to specify the project name as a prefix to the class name. So instead of just specifying “LogItem” as the class, it needs to say “MyLog.LogItem”, assuming your app is called “MyLog”.”
You never stated why we need to change the name to have the prefix of our app name. Why is this step so important. I just don’t understand why we are doing this? Could you please elaborate?
Thanks!
Well, we need to specify what the Swift class that’s associated with the Core Data entity is (they aren’t the same things, they get tied together when we generate our NSMangedObject subclass)
But from Core Data’s perspective, it doesn’t know about the classes inside of MyLog. “MyLog” is like another project as far as Core Data is concerned, so it gets prefixed. The class isn’t just “LogItem”, it’s “MyLog.LogItem” — The LogItem class inside of the MyLog project.
these lines at the beginning of your tutorial for Xcode 6.3 causes error in Xcode 6.2
// Retreive the managedObjectContext from AppDelegate
let managedObjectContext = (UIApplication.sharedApplication().delegate as! AppDelegate).managedObjectContext
It wants to insert a comma between as and the exclamation mark e.g.. as,!
Expected type after ‘as’
Expected ‘,’ separator
Expected expression in list of expressions
Consecutive declarations on a line must be separated by ‘;’
Expected declaration
and warning
Constant ‘managedObjectContext’ inferred to have type ‘()’, which may be unexpected
Builds now fail
Change as! to as if you are on Xcode 6.2
“You’ve now stored and retrieved data from Core Data.” As far as I’ve understood this tutorial we didn’t store anything. I inspected the db (https://itunes.apple.com/nl/app/sqlite-professional-read-only/id635299994?l=en&mt=12) after I launched and stopped the application and it was empty. I think you’re gonna do this in the next parts, but you shouldn’t say you’ve stored something in Core Data…
Core Data is not just a system to persist data to disk, which is what you’re describing. Core Data is an object graph that handles querying of data and complex operations such as undo graphs and a relationship manager. Having stored something in Core Data could be for those purposes, rather than the persistence functionality. So no, it is not persisted to disk at this stage yet, but it absolutely is stored in Core Data. Persisting to disk is in fact covered in the later parts.
aah okay, thank you for the explanation!
Hey Jameson this is some great stuff you wrote! but Xcode doesnot let me choose the langauge for the nsmanagedobject subclass it makes two files though one with .h and the other with .m extension any idea what could be wrong? i am using xcode v6.0 on vmware.
Hm, this might be because of the version, try upgrading to Xcode 6.3, and if that doesn’t work you can just create the file on your own without using the generator, just copy what is shown in the github repo.
I’m getting an error at the line:
let newItem = NSEntityDescription.insertNewObjectForEntityForName(“Settings”, inManagedObjectContext: self.managedObjectContext!) as! Settings
Could not cast value of type ‘NSManagedObject_Settings_’ (0x7ff89ad87a00) to ‘JobManager.Settings’ (0x104f214a0).
Everything seems to work well for fetching so far. Did something change in xcode since this was posted or did I mess something up?
I’m not sure, but it’s possible it’s an Xcode change. I’ll review this tutorial this weekend to make sure. In the meantime if you want to put up a github repo of your code I can give it a whirl to see if I can find the issue.
I had the same problem. I did a little searching and it looks like you need to prefix the class name in the xcdatamodeld before exporting the swift file. So just go back to the xcdatamodel, change the class field from LogItem to MyLog.LogItem and then from the editor menu “Create NSManagedObjectSubclass” to replace the current file.
here’s the stack exchange discussion with the solution http://stackoverflow.com/questions/25076276/unable-to-find-specific-subclass-of-nsmanagedobject
I followed the tutorial exactly as you said – I’m still very new to both Xcode and Swift, but I got stuck at adding this line to ViewController.swift
let newItem = NSEntityDescription.insertNewObjectForEntityForName(“LogItem”, inManagedObjectContext: self.managedObjectContext!) as! LogItem
Xcode would not recognise NSEntityDescription. A quick google, and I realised that NSEntityDescription is part of the CoreData framework, and Core Data hadn’t been imported into ViewController.
So, I just need to remember to add import CoreData to all my view controllers.
1st part> Clas name Should be just LogItem. else it Doesnt work 🙂
I get an error saying
“cannot force unwrap value of non-optional type “NSManagedOBjectContext””
on the
let managedObjectContext = (UIApplication.sharedApplication().delegate as! AppDelegate).managedObjectContext
command, I get similar errors following any number of other tutorials about core data, its driving me a little mad!
Any help would be great.
That means there is an exclamation mark somewhere where it’s not necessary. Just remove the ! symbol.
(This is the result of ongoing Swift changes from Apple)
if let fetchResults = managedObjectContext.executeFetchRequest(fetchRequest, error = nil) as? [Paitient]
I wrote this line of code but I keep getting an error that says:
Use of unresolved identifier ‘error’
What should I do?
Thank you
put try catch like this:
// Create a new fetch request using the LogItem entity
let fetchRequest = NSFetchRequest(entityName: “LogItem”)
do {
let fetchResults = try managedObjectContext.executeFetchRequest(fetchRequest) as! [LogItem]
// Create an Alert, and set it’s message to whatever the itemText is
let alert = UIAlertController(title: fetchResults[0].title,
message: fetchResults[0].itemText,
preferredStyle: .Alert)
// Display the alert
self.presentViewController(alert,
animated: true,
completion: nil)
} catch let error as NSError { print(“some error \(error), \(error.userInfo)”) }